Vim tips

5 Vim tips for advanced users

This blog post lists out my top five Vim tips and tricks to bring your Vim game to the next level.

Here at Dogsbody Technology we are connected to servers, editing files and improving configs every day. All of this means that a good text editor is a must. That is why we chose Vim.

I assume you know the basics, If you don’t I recommend starting here.

Tip 1: Use Vim as a file browser

Have you ever accidentally opened a directory in vim? if you had, you would be pleasantly surprised that it creates a nice interface to find and start editing the file you meant.

Well you can get to that menu another way:

:Explore

From this menu you can use your arrow keys to select and open up new files for editing.

Of course if you already know the file name, just open it directly:

:open filename

Phew I was worried I might need to leave vim for a second then.

Tip 2: Try out multi-line inserts

*tap**tap**tap**tap**tap**tap**tap* the sound of a colleague commenting out a code block. Slow, noisy. Vim has a much quicker approach using visual blocks:

ctrl + v # Enter visual block mode and using your arrow keys select all of the lines you wish to edit
ctrl + shift + i # Enter insert mode
"Example text entry"
Esc # Stop entering text

A very similar method can be used to append text to lines.

ctrl + v 
end # Move the cursor to the end of the line - This works even if the line endings are different lengths 
ctrl + shift + a # Enter append insert mode
"Example text entry"
Esc

You can also use visual block mode to quickly delete a large area of text. Just select it and press “d”.

Tip 3: Make the most of macros

Macros are incredibly simple and just as powerful. They are a sequence of Vim inputs and commands that you can re-run at the touch of a button.

Here’s how to start recording your custom macro:

q # Start recording
j # or any other character you want to trigger it
# any collection of commands you want
q # Stop recording

Then to run the macro:

# To run the "j" macro
@
j

To quickly re-run the last macro, you can double tap “@” or just hold it.

Simple to learn, but when you combine it with other commands, you can quickly build something amazing.

For example – I had a JSON blob containing a list of different SSH keys multiple times. I needed to delete the second key that matched the word “frank”. Quickly creating a macro that runs a search, go to next line, delete. Manually this job would have taken half an hour, with Macros, just five mins.

Tip 4: All the things she ‘sed’

…running through my head

Vim has an inbuilt stream editor, this enables you to modify lines in a quick and replicable manner. But did you know that it comes with regex support out of the box?

Lets look at this command:

:% s/\(wibble\)/ --> \1 <-- /g
:g/[Ww]ibble/d

The first command finds the word “wibble” and puts two big arrows around it, not very useful but a good example:

  • The “%” at the beginning tells it to match all lines. Alternatively you could put in specific line numbers (e.x. 5,13 – match lines five to thirteen)
  • “s/$input/$output/g” start a text substitution. Ending g means match multiple times on one line.
  • \(wibble\) create a capture group looking for the word “wibble”.  Notice that the braces need escaping, unlike normal regex.
  • \1 return the contents of capture group one

The second command uses a slightly different function. It deletes all lines with the word wibble in them, matching both with an without a capital letter W.

If you need to brush up on your regex, we find the regexr site an indispensable resource.

Tip 5: Escaping

If you have ever seen this error “E45: 'readonly' option is set” then you have probably seen this work around…

:w ! sudo tee %

But did you know you can expand this to use any bash commands?

:w ! sort | uniq | tee %

These commands sort the file, then remove any duplicate lines before using tee to write the output back into your vim file.

That concludes my top five Vim tips. Vim is an astonishingly advanced tool that rewards you the further you dig into it.

Did you learn something new? Do you have your own Vim tips to share? Leave us a message in the comments below!

What’s a hosts file?

In the early days of the internet the hosts file was created. It is a text file which stores the domain name you are going to (www.example.com) and the IP address where it is hosted (203.0.133.54).

It is just like an address book, it stores your friends phone numbers for when you want to contact them. Originally network admins had to store every domain they knew about in hosts file but this was quickly replaced when the internet became so big this was impossible. This information is now provided by a service called DNS (domain name service) but nearly every system still supports the hosts file.

It is very useful to know that the hosts file is checked before DNS and therefore can be used to overwrite DNS on your computer. This is immensely useful for testing, development work and moving things around on the internet. We regularly use hosts files to test websites on new servers without interrupting normal site visitors.

How to change your hosts file:

Windows 10 and 8

1. Press the Windows key

2. Type “Notepad” into search

3. Right click on the Notepad app and select “Run as administrator”

4. From Notepad, open the following file: “c:\Windows\System32\Drivers\etc\hosts”

5. Make your changes

6. Save the file

macOS (Mojave)

1. Open up the terminal (this is found in Applications/Utilities)

2. sudo nano /private/etc/hosts

3. Make your changes

4. Save the file (ctrl-x and then y)

You will need to clear the system cache before your changes are loaded in.

5. sudo killall -HUP mDNSResponder

Linux

1. Open a terminal

2. sudo vim /etc/hosts

3. Make your changes

4. Save the file

I am in my hosts file, now what?

Hosts files are written as so:

ip.ad.dr.ess      domain names

For example if you wanted all traffic to dogsbody.com (and www.) to instead go to 203.0.133.54:

203.0.133.54      www.dogsbody.com dogsbody.com


Finally remember to revert your changes when you have finished testing!

Migrating websites? updating DNS? kerfufled? contact us today

Feature image by Michal Jarmoluk licensed for Free.

5 things you need to know when working with big logs

With everything being logged the logs on a busy server can get very big and very noisy. The bigger your logs the harder it is to extract the information you want, therefore it is essential to have a number of analytics techniques up your sleeve.

In the case of an outage logs are indispensable to see what happened. If you’re under attack it will be logged. Everything is logged so it is essential to pay attention.
– From my last blog post why there’s nothing quite like Logcheck.

These are our top five tips when working with large log files.

1. tail

The biggest issue with log files is the size, logs can easily grow into gigabytes. Most text editing tools normally used with other text files (vim, nano, gedit etc) load these files into memory, this is not an option when the file is larger than your systems memory.

The tail command fixes this by only getting the bottom lines of the log file. It fixes the problem of reading the whole file into memory by only loading the final bytes of the file.

Log files nearly always have new log lines appended to the bottom of them meaning they are already in chronological order. tail therefore gets you the most recent logs.

A good technique with this is to use tail to export a section of the log (in this example the last 5000 lines of the log). This means you can comb a smaller extract (perhaps with the further tools below) without needing to look through every single log line, reducing resource usage on the server.

tail -5000 > ~/logfile.log

You may also find the head command useful, it is just like tail but for the top lines in a file.

2. grep is your best friend.

Perhaps you are only interested in a certain lines in your log file, then you need grep.

For example if you are only interested in a specific timestamp, this grep returns all of the logs that match the 05th March 2019 at 11:30 until 11:39.

grep "05/Mar/2019:11:3" logfile.log

When using grep you need to know what is in the log file and how it is formatted, head and tail can help there.

Be careful to not assume things, different logs are often written in different formats logs even when they are created by the one application (for example trying to compare webserver access and error logs).

So far I have only used grep inclusively but you can also use it to exclude lines. For example the bellow command returns all logs from the 05th of March at 11:30 and then removes lines from two IP’s. You can use this to remove your office IP’s from your log analytics.

grep "05/Mar/2019:11:3" logfile.log | grep -v '203.0.113.43\|203.0.113.44'

3. Unique identifiers

grep is at its best when working with unique identifiers as you saw above we focussed in on a specific time stamps. This can be extended to any unique identifier but what do you look for?

A great unique identifier for web server logs is the visitors IP address this can be used to follow their session and see all of the URL’s they visited on the site. Unless they are trying to obfuscate it, their IP address persists everywhere the visitor goes so can be used when collating logs between multiple servers.

grep "203.0.113.43" server1-logfile.log server2-logfile.log

Some software includes its own unique identifiers for example email software like postfix logs a unique ID against each email it processes. You can use this identifier to collate all logs related to a specific email. It could be that the email has been stuck in the system for days which this approach will pick up on.

This command will retrieve all logs with the unique identifier 123ABC123A from all files that start “mail.log” (mail.log.1, mail.log.3.gz)

zgrep '123ABC123A' mail.log*

Taking points 2 and 3 one step further, with a little bit of command line magic. This command returns the IP addresses of the most frequent site visitors at on the 5th of March at 11 AM.

grep "05/Mar/2019:11:" nginx-access.log | awk '{ print $1 }' | sort | uniq -c | sort -n | tail

4. Logrotate

As I have said before logs build up quickly over time and to keep your logs manageable it is good to rotate them. This means that rather than one huge log file you have multiple of smaller files. Logrotate is a system tool which does this, in fact you may likely find that it is already installed.

It stores its config’s in /etc/logrotate.d and most software provides their own config’s to rotate their logs.

If you are still dealing with large log files then it may well be time to edit these config’s.

A quick win might be rotating the file daily rather than weekly.

You can also configure logrotate to rotate files based on size rather than date.

5. AWS Athena

AWS Athena brings your log analytics to the next level. With it you can turn your text log file into a database and search it with SQL queries. This is great for when you are working with huge volumes of log data. To make this easier Athena natively supports the Apache log format and only charge you for the queries you make.

AWS have lots of good documentation on setting up Athena and tying it into Apache logs.

Fighting huge log files? not getting the insights you want? Contact us and see how we can help.


Feature image by Ruth Hartnup licensed CC BY 2.0.

Multi -Factor Authentication And Why You Should Use it

With ever-growing portions of our lives spent on the internet, or using services that depend on it, keeping your online accounts secure has never been more important. A breach of a key personal account can have devastating effects on our lives. Think identity theft, or embarrassing information/media being leaked.

One of the most effective solutions to this problem is Multi-Factor Authentication, or MFA (sometimes written 2FA for 2 Factor Authentication).

What is MFA?

MFA is a process by which more than one piece of information is required in order to authenticate against a service or provider.

What’s the problem?

In days of old, and still on less tech-savvy sites on the internet, a single username and password combination would be sufficient to grant you access to an account. Now in an ideal world, everybody would use lengthy and difficult to guess passwords, using different passwords for every service. But humans will be human, and take the easier route of using shorter, easy to remember, and worst of all common passwords. This inevitably leads to accounts being compromised when those common passwords are tried, or when the attacker reads the post-it that’s stuck to the bottom of your monitor…

How does MFA help?

MFA helps to resolve this problem by requiring a second piece of information; a second factor. This second factor can be many different things, with different sites offering the choices they think best. The most common are:

  • email
  • SMS
  • Automated phone call
  • Mobile device

How does it work?

Upon entering your valid username and password combination, the site or application will ask you for your second factor. If you provide this second factor correctly, then you will be authenticated. If you provide the wrong information, or no information at all, then you are denied. Simple right?

Isn’t this essentially just a second password?

Great question! Some sites may just require a second piece of text for your second factor, and in this case, it is essentially just a second password yes. However, good MFA is usually configured so that is requires something you know, and something you have. For example, a password, and an SMS. Using SMS as the second factor requires the user to have the mobile phone with the number configured on the account. Same for a phone call. This means that if somebody learns your password, it is useless unless they also have your unlocked mobile phone.

The next thing to consider is that the second factor is changing regularly and often. When a provider sends you an SMS, this is usually valid for a short period of time, say 10 minutes. If you wish to login after this time, you must receive a new SMS with a new passcode. This of course prevents people from writing the second factor down, as it would be useless a short while later, and also means that if an attacker were to find out what the second factor was, they would have a very short window in which to login.

Side note: though we’ve used SMS as an example here, there’s a growing movement of people that consider it insecure due to demonstrated attacks which are able to bypass this second factor. As with any security procedure, you should always consider it’s merits and potential weaknesses before putting it in place yourselves.

In summary MFA is both a simple and effective way of keeping your online accounts secure. We strongly recommend everyone enables it where possible. You should still continue to use strong passwords and follow best practices in terms of security too. 

Feature image background by ChrisDag licensed CC BY 2.0.


stacked logs

Why there’s nothing quite like Logcheck

Anyone who has been to a techie conference in the last few years will know there are lots of log management tools out there, but none have filled the space Logcheck has in our hearts servers.

Logs are our bread and butter. They store details on everything that happens on any server; each request to each asset on this webpage is logged, every login and email sent. In the case of an outage logs are indispensable to see what happened. If you’re under attack it will be logged. Everything is logged so it is essential to pay attention.

Manually checking all server logs is a slow and arduous task and quickly becomes impossible as you scale up. We actively monitor server logs with Logcheck. Logcheck makes this log monitoring possible across hundreds of servers by reducing the logs needing to be looked at, it does this with the exception tracking approach.

Most log management tools use a blacklist approach, looking for bad words such as “attack”, “bad” and “error”. In doing so they only tell you about the “known bad”, the log lines that have shown errors before. Big problems will come if you’re hosting a brand new app or using new software, there is no way of knowing what is bad and what should be alerted on. You rely completely on the new software to have configured logging that matches your current rules.

Logcheck’s whitelist approach fixes the problem these other tools have, as it passes you all unknown/rogue logs. This makes it perfect for any venture in to the unknown by telling you exceptions to known good rules.

Regex can be used in the whitelist making the rules very customisable and still broad enough to not have to whitelist every single combination of log.  We maintain our whitelist rules on a per-server basis, as logs that are OK on one server could indicate a problem on another.

Logcheck and log administration are services offered in our maintenance packages.

Contact us today to find out more!

Feature image background by gregloby licensed CC BY 2.0.

Alternative Map for WordPress

On 11th June 2018 Google made a massive change to its Google Maps API that has now broken a lot of websites that contain maps. Whilst you can fix this by getting a Google Maps API key and giving them a mandatory credit card to charge you if you go above their free band, a lot of people don’t want to do this and are looking for alternatives.

This guide is how to set up a basic alternative in WordPress which doesn’t require a google account or entering credit card details to use the service.

Please note there are many Map Plugins for WordPress out there –  this is not a recommendation but the easiest one we could find that worked and fitted our criteria. We are not web developers, this article is to help our smaller hosting customers set up new maps on their website(s).

Install instructions

  1. Once logged into your website, install and activate the Plugin Leaflet Map. Once activated it will appear in the left hand menu.
  2. Go to Leaflet Map – Shortcode Helper and use the Map to position your marker pin (marked Drag Me) to your location.
  3. Copy both the Interactive Shortcodes – Map Shortcode and Marker Shortcode
    (I’d advise putting them in a text document so they are accessible as the map resets as soon as you leave the page). Example Shortcode only – DO NOT use these shortcodes
    Map Shortcode
    [leaflet-map lat=51.278722859212216 lng=-0.7769823074340821 zoom=14]
    Marker Shortcode
    [leaflet-marker lat=51.27931344408708 lng=-0.7895135879516603]
  4. These short code can now be entered onto a Page, Post or in a Text widget (Appearance – Widgets) and a map will be active .
  5. You can edit the zoom number as you see fit.
    [leaflet-map lat=51.278722859212216 lng=-0.7769823074340821 zoom=11]

The above will give you a simple map with a marker pin at your location.

Added Features

You can add a number of features. Below we help set up the two we feel are useful.

Adding text to your marker pin

To add text to your marker pin as per the example above you need to edit the code in your Marker Shortcode on your page, post or widget.

Simply insert the text you wish to display to the end of your leaflet-marker code and add [/leaflet-marker] at the end of the text.

Example below:

[leaflet-marker lat=51.27931344408708 lng=-0.7895135879516603]Cody Technology Park
Old Ively Road
Farnborough
GU14 0LX[/leaflet-marker]

Adding zoom buttons to your map

To add zoom buttons you need to edit the code in your Map Shortcode on your page, post or widget.

Previously your Map sortcode looked like this:

[leaflet-map lat=51.278722859212216 lng=-0.7769823074340821 zoom=14]

Below is the code you need to add.

[leaflet-map lat=51.278722859212216 lng=-0.7769823074340821 zoom=14 zoomcontrol=1]

Always set zoom control to 1.

Again you can edit the zoom= number  as you see fit
[leaflet-map lat=51.278722859212216 lng=-0.7769823074340821 zoom=11 zoomcontrol=1]

As with all plugins you need to ensure you keep them updated to the latest version so they do not become a vulnerability to your website.

Hopefully this will help smaller website owners with no web developers to make these changes to their website themselves. If you require help please contact us for a quote.

Root email notifications with postfix

Now that Ubuntu 18.04 is out and stable, we are busy building servers to the latest and greatest. One of the most important parts of new servers builds is root notifications. This is a common way for the server to contact you if anything goes wrong. Postfix is a popular piece of email software, alternatively you can use exim or sendmail. I will be guiding you through a Postfix install on an Ubuntu 18.04 server.

“I wanna scream and shout and let it all out”.
– will.i.am & Britney Spears

Postfix set up

Install the postfix email software:

sudo apt-get install postfix mailutils

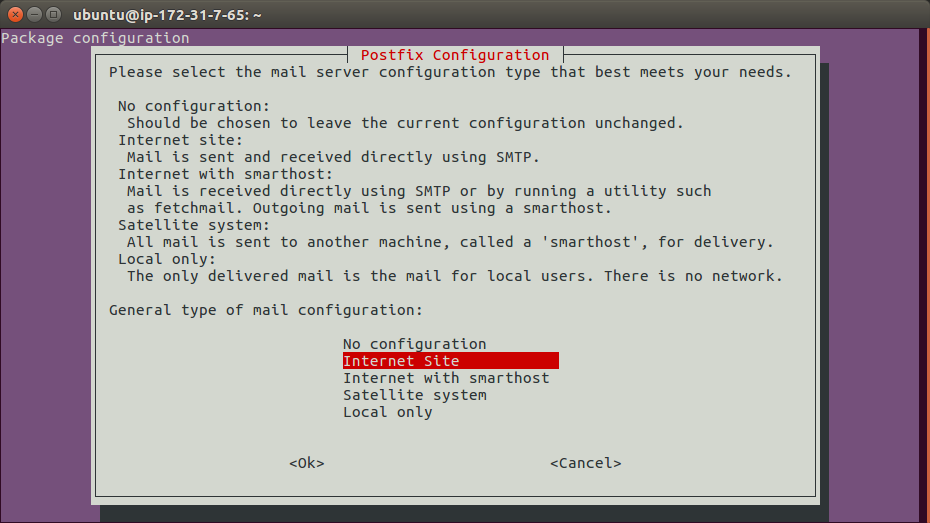
The following screen will pop up. I am setting up a Internet site where email is sent directly using SMTP.

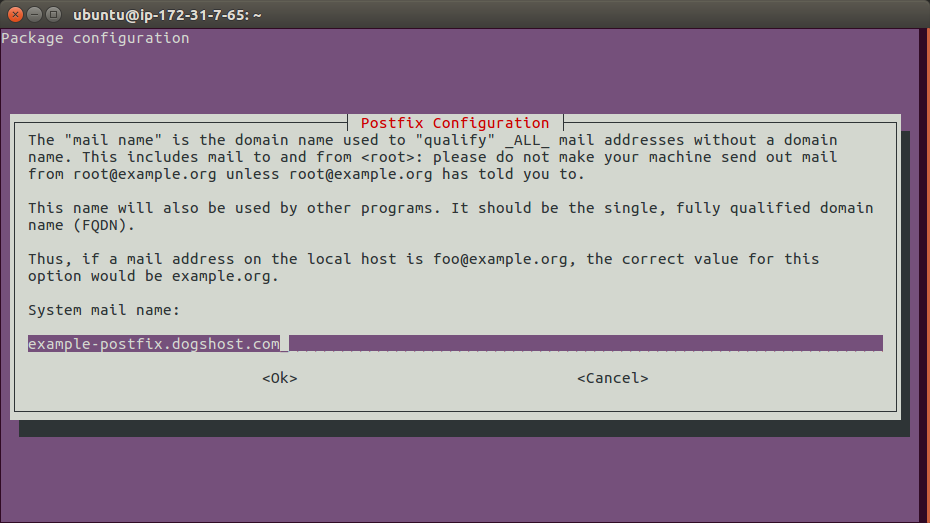
Next enter the server hostname.

If you want to change these settings after the initial install you can with sudo dpkg-reconfigure postfix. There are a number of other prompts for different settings, but I have found the default values are all sensible out of the box.

Now to configure where email notifications are sent to:

sudo vim /etc/aliases

In this file you should already have the “postmaster” alias set to root.  This means that any emails to postmaster are sent on to the root user, making it even more important root emails are seen.

It is good practice to set up a few other common aliases. “admin” and your admin username (In my case this was “ubuntu”).

Finally we need to send root email somewhere.  Your file should end up looking like this…

postmaster: root
admin: root
ubuntu: root
root: replaceme@example.com

Obviously “replaceme@example.com” should be an email address you have access to and check regularly.

These new aliases need to be loaded into the hashed alias database (/etc/aliases.db) with the following command:

sudo newaliases

Finally send an email to the root user (which should be sent onto the email you configured above) testing our setup is working:

echo "Testing my new postfix setup" | mail -s "Test email from `hostname`" root

Sending Problems?

If you have done the above and are still having problems sending email there are two first points of call I would check.

This command shows all queued email that is waiting to be sent out by the server. If an email is stuck it will show up here.

sudo mailq


All postfix actions are logged into /var/log/mail.log. You will want to look specifically at the postfix/smtpd messages as that is the process which is talking out of your server to others.

A useful tip for debugging is to use tail -f to monitor a log file for any updates. Then in another terminal session, try to send another email. You can then watch for the corresponding log entries in the original terminal. This way you can be sure which log entries you need to be focusing on.

tail -f /var/log/mail.log


Another thing to consider is that your server is part of the bigger internet where spam is a serious issue.

Your servers reputation is important in effecting how email is received, there are technologies you can set up to improve reputation.

Some providers have their own anti-spam protection that could be affecting you such as Google Cloud blocking all traffic on port 25, 465 and 587 & AWS throttling port 25.

Now email is working

Make sure your server scripts and crons are set up to send alerts, and not fail silently. With crons there is a variable to manage this for you, just add MAILTO=root at the top of your cron file.

Lastly, don’t fall victim to alert fatigue. It is easy to send all email to root but this will quickly become tiring. You should only get emails if something goes wrong, or if something needs to be actioned. This way, when a new email comes in you know you need to look at it.


Need help setting up email? Struggling with emails failing to send? Want someone else to receive and manage server notifications? Contact us and see how we can help today!


Feature image background by tejvan licensed CC BY 2.0.

How to set-up unattended-upgrades

Making sure software is kept up to date is very important.  Especially when it comes to security updates.  Unattended-upgrades is a package for Ubuntu and Debian based systems that can be configured to update the system automatically.  We’ve already discussed manual patching vs auto patching, most of this post will assume you’d like to set-up automatic updates.  If you want complete control of updates you may need to disable unattended-upgrades, see the manual updates section below.

Automatic Updates

Make sure you have installed unattended-upgrades and update-notifier-common (in order to better determine when reboots are required).  On some recent operating systems unattended-upgrades will already be installed.

sudo apt-get install unattended-upgrades update-notifier-common

Once unattended-upgrades is installed you can find the configs in /etc/apt/apt.conf.d/.  The 50unattended-upgrades config file has the default settings and some useful comments.  20auto-upgrades defines that updates should be taken daily. The default configuration will install updates from the security repository

We would suggest creating a new file and overwriting the variables you want to set rather than changing files that are managed by the package.

You can create the following as /etc/apt/apt.conf.d/99auto-upgrades:

# Install updates from any repo (not just the security repos)
Unattended-Upgrade::Allowed-Origins {
"*:*";
};
# Send email to root but only if there are errors (this requires you to have root email set-up to go somewhere)
Unattended-Upgrade::Mail "root";
Unattended-Upgrade::MailOnlyOnError "true";
# Remove packages that should no longer be required (this helps avoid filling up /boot with old kernels)
Unattended-Upgrade::Remove-Unused-Dependencies "true";
# How often to carry out various tasks, 7 is weekly, 1 is daily, 0 is never
APT::Periodic::Update-Package-Lists "1";
APT::Periodic::Download-Upgradeable-Packages "1";
APT::Periodic::AutocleanInterval "7";
APT::Periodic::Unattended-Upgrade "1";
# Use new configs where available but if there is a conflict always keep the current configs.
# This has potential to break things but without it the server won't be able to automatically update
# packages if you have changed a configuration file that the package now has an updated version of.
Dpkg::Options {
"--force-confdef";
"--force-confold";
}
# Some updates require a reboot to load in their changes, if you don't want to monitor this yourself then enable automatic reboots
Unattended-Upgrade::Automatic-Reboot "true";
# If you want the server to wait until a specific time to reboot you can set a time
#Unattended-Upgrade::Automatic-Reboot-Time "02:00";

Have a look at the comments but the key things to point out here are:

  • The above config will install all updates.  You can define what repositories to update from as well as any packages to hold back but then you will obviously end up with some software out of data.
  • It is important to make sure you will be informed when something goes wrong.  One way to do this is to send errors to root and have all root email sent to you (you can define this in /etc/aliases).  To test you are receiving email for root you can run:
    echo "Test email body" | mail -s "Test email subject" root
  • If you aren’t going to follow security updates and decide when to reboot your server make sure you have automatic reboots enabled, it is probably worth setting an appropriate reboot time.

Manual updates

If you want to manually update your server then there is no need for you to install unattended-upgrades.  However as some operating systems have it pre-installed so you may have to disable it.  The easiest way to disable unattended-upgrades is to create the following as /etc/apt/apt.conf.d/99disable-auto-upgrades:

APT::Periodic::Unattended-Upgrade "0";

Feature image by Les Chatfield licensed CC BY 2.0.

The Importance of Backups

Operating systems and applications can be re-installed with relative ease, but personal data is just that, personal. Nobody else (hopefully) has any copies of it, so if you lose it, that’s it, it’s gone forever. For this reason, it’s important to keep backups of your personal data.

That being said, backups of reproducible data can still be very useful as well, if the time it would take you to recreate said data is more valuable to you than the data itself. For example, it’s very easy to get an operating system set up the way you like it, but if you want to get on with creating things, instead of setting things up, then it’s worth having backups that allow you to get going again quickly should the worst happen.

What should you backup? How often? Why?

As we touched on above, you should back up anything that is irreplaceable (photos, letters, nan’s recipes), and anything that would take a non-trivial amount of time to recreate. How often to backup your data depends on a few things:

  • How often is it changing? Taking daily backups is pointless if your data is only changing once a week. On the flip side, backing up once a week if you’re data is changing daily also leaves a lot of room for lost work, which brings us to our next point
  • Granularity – how much detail would you like your backups to cover? Lets use a novel you’re writing for an example. How often would you want to save copies of your work? Every page? Every paragraph? Every line? Every word? Whilst this isn’t the best example, seeing as storage is so cheap nowadays you could store every different letter and get away with it, it illustrates the concept nicely. Even if a paragraph in your novel only takes a few minutes to write, what about the ideas in that paragraph, can you guarantee that you’ll think of the same great words next time if you were forced to rewrite it? Make sure you can track changes in the right detail can make all the difference between having backups, and having useful backups.
  • Storage costs – Let’s scrap the novel idea for now and think big, really big. Take a media production house, they’re gonna be storing Gigabytes, maybe Terabytes of data per project. This can result in some serious costs for your storage hardware. Unlike the novel, the cost of saving a copy after every change would be prohibitive, so you need to draw the line somewhere else. Where this line falls again comes back to the time-cost comparison: how much will it cost you to store the backups, and how much would it cost you to carry out the work again? Missing an important deadline to lost data is a real pain and can make you look unprofessional.

The 3-2-1 Rule

This is a common rule when talking about backups, at least at the simpler levels. The rule dictates that you should always aim for:

  • At least three copies of your data
  • On at least two different storage mediums
  • With least one of these copies in an off-site location

For example, one copy of the data on on your hard disk, one copy on an external drive, and a final copy in the cloud. This gives you a great chance of recovering your data in the event of problems. With the ubiquity of moderately priced external storage, and the plethora of free cloud storage solutions out there, it makes it really, really easy to have multiple copies of your most valued bytes.

RAID, why it’s great, and why it’s not a backup

RAID (Redundant Array of Independent Disks) is a technology that used to be found solely in the enterprise. However, as with most things in the tech world, it has found it’s way down into the levels of your everyday users over the years. RAID allows you to keep multiple copies of your data automatically and transparently with relative easy. At the user level, you save you data just as you normally would. But behind the scenes, clever bits of hardware and/or software makes multiple copies of this data and store it on multiple physical disks. In it’s most basic form, RAID-1, also know as a mirror, does just that; mirrors your data. One file (or millions of them) stored identically on two (or more) disks. If one of the disks stops working, you can grab your data back from the other disks. Great right? Yes.

However, RAID is not the solution to all of your backup woes. RAID’s strength can also be seen as it’s downfall, and that is that it does things automatically. If you delete a file, it’s deleted from all of the disks. It’s not clever enough to realise that you didn’t actually want to remove that file forever. Remember, computers are dumb, they just do what you tell them. RAID can be seen as increasing the availability of your data. It saves you having to pull copies from your other storage methods from the 3-2-1 rule. What it doesn’t protect again is somebody clicking the wrong button and washing away all of your favourite pictures.

This is another advantage to the 3-2-1 rule. Even if you delete something on your primary storage, chances are that you realise before you sync this storage to your secondary storage. And if you don’t catch it then, then chances are you will catch it before you sync things to your off-site storage. These layers offer time delays allowing you to realise your mistakes and correct them.

Testing your backups

Testing your backups is of critical but often overlooked importance. Having all the backups in the world is still no good if they don’t actually work. For this reason, you should try to verify your backups are in good condition as often as possible. Make sure that novel opens fine in your text editor, make sure some of those family photos aren’t missing etc etc. It’ll be devastating to find out your golden backup solution is anything but in the times when you need it most.

Let us help

If in reading this blog post you’ve had a panic and realised your server is lacking any meaningful backup solutions, then please get in touch. We’d love to get your data stored away safely for you.


Feature image background by gothopotam licensed CC BY 2.0.

Holey jeans

Manual patching vs auto patching

Everyone agrees keeping your software and devices updated is important.  These can be manually or automatically installed.  People assume that automatic is the better option however both have their advantages.

I’m Rob, I look after maintenance packages here at Dogsbody Technology. I want to explain the advantages between the two main patching approaches.

What to Patch

Before we get into the differences of how to patch it’s worth discussing what to patch.

Generally speaking we want to patch everything.  A patch has been produced for a reason to either fix a bug or security issue.

Sometimes patches add new features to a package and this can be when issues occur.  Adding new features can cause things to break (usually due to broken configuration files).

Identifying when a patch release is for a bug, a security fix or adding a feature can be hard. In some cases the patch can be all three things.  Some operating systems try and separate or tag security patches separately however our experience shows that these are rarely accurate.

One of the reasons we like manual patching so much is that it allows us to treat each patch/customer/server combination independently and only install what is required, when it is required.

Auto Patching Advantages

The server checks and updates itself regularly (hourly/daily/weekly).

  • Patches can easily be installed out of hours overnight.
  • Patches are installed during the weekend and bank holidays.
  • Perfect for dev environments where downtime is OK.
  • Perfect for use in Constant Integration (CI) workflows where new patches can be tested before being put into production.

Our automatic patching strategy is to typically install all patches available for the system as it is the only sure way to know you have all the security patches required.

Manual Patching Advantages

A notification (e-mail or internal ticket) is sent to the server admin who logs onto the server and installs the latest updates.

  • Patches can be held during busy/quiet periods.
  • The admin can ensure that services are always restarted to use the patch.
  • The admin can search for dependant applications that maybe using a library that has been patched (e.g. glibc patches)
  • The admin is already logged onto the server ready to act in case something does break.
  • Kernel reboots (e.g. Meltdown or Stack Clash) can be scheduled in and mitigated.
  • Configuration changes can be reviewed and new options implemented when they are released. Catching issues before something tries to load a broken configuration file.
  • Perfect for production environments where you need control. Manual patching works around your business.

Because we manually track the packages used by a customer we can quickly identify when a patch is a security update for that specific server.  We typically patch security updates on the day it is released also install non-security updates at the same time to ensure the system has the latest and greatest.


Are you unsure of your current patch strategy? Unsure what the best solution is for you? Contact us today!


Feature image background by Courtnei Moon licensed CC BY 2.0.