Setting up IPv6 on your EC2

This is the second part of a two part series on setting up IPv6 in Amazon Web Services (AWS).  The first part discussed setting up IPv6 in your AWS VPC.  This second part will discuss setting up IPv6 on your EC2 instances.

Why there are no new IPv4 jokes? Because it is exhausted!

Seeing as most of you have come from our other blog post we’ll jump straight in…

Step 1: Security Groups

Do one thing and do it well, a great philosophy we follow at Dogsbody Technology. AWS follow it strongly as well splitting their server hosting into many individual services. Security Groups are their firewall service, and since they are based on IP addresses they need updating for IPv6.

  1. Open the EC2 management console, you can also find this by selecting the services menu at the top left and searching for “EC2”.
  2. In the navigation bar, under the “Network & Security” tab, Select Security Groups.
  3. Select a Security Group in your VPC
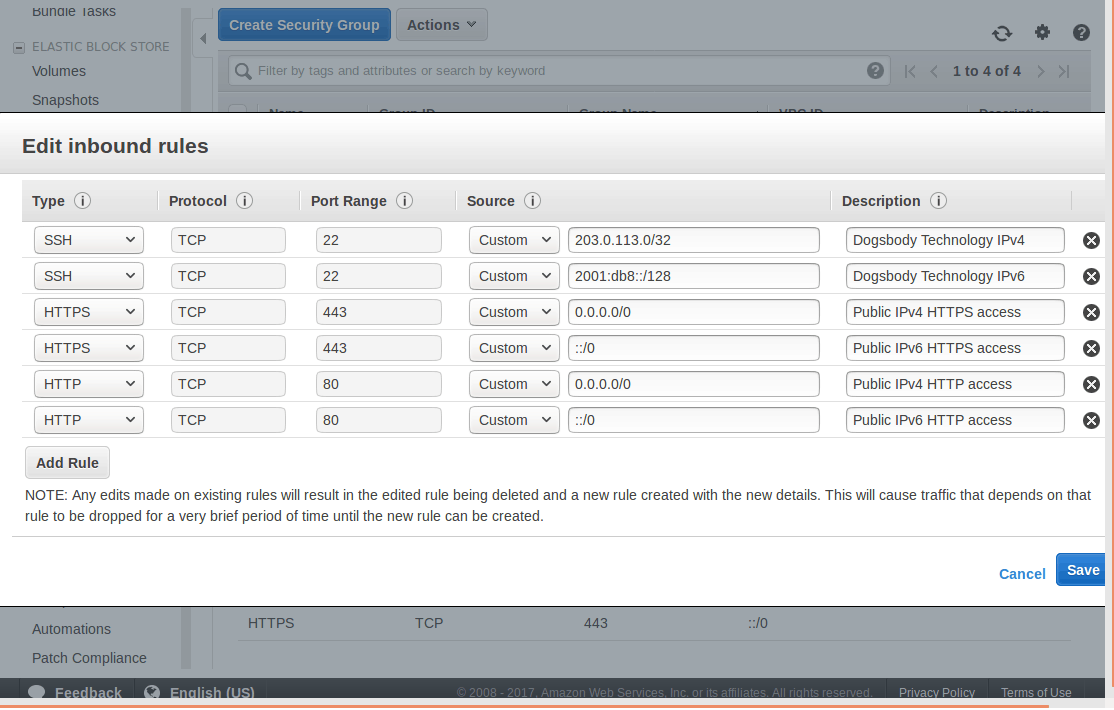
  4. Select the “Inbound” tab and “Edit” the rules
    • There should be an IPv6 record mirroring your current IPv4 ones.
    • Remember ::/0 is the IPv6 equivalent of 0.0.0.0/0.Adding new IPv6 rules to the security group
  5. Now inbound IPv6 traffic is allowed into the server we need to allow traffic out.
  6. Select the “Outbound” tab and “Edit” the rules
    • Create new IPv6 outbound rules just as you have IPv4.
    • With most of our servers we have no reason to block outbound traffic, we can trust our server, so this is as simple as follows:
      • Type, All traffic; Protocol, All; Port Range, 0 – 65535; Destination, ::/0; Description, Allow all IPv6 Traffic out.

Step 2: Assign the IP address

The final step in AWS is to assign your new IP address. This will be your new name in the IPv6 world.

  1. Under the navigation bar select “Instances”
  2. Select your instance
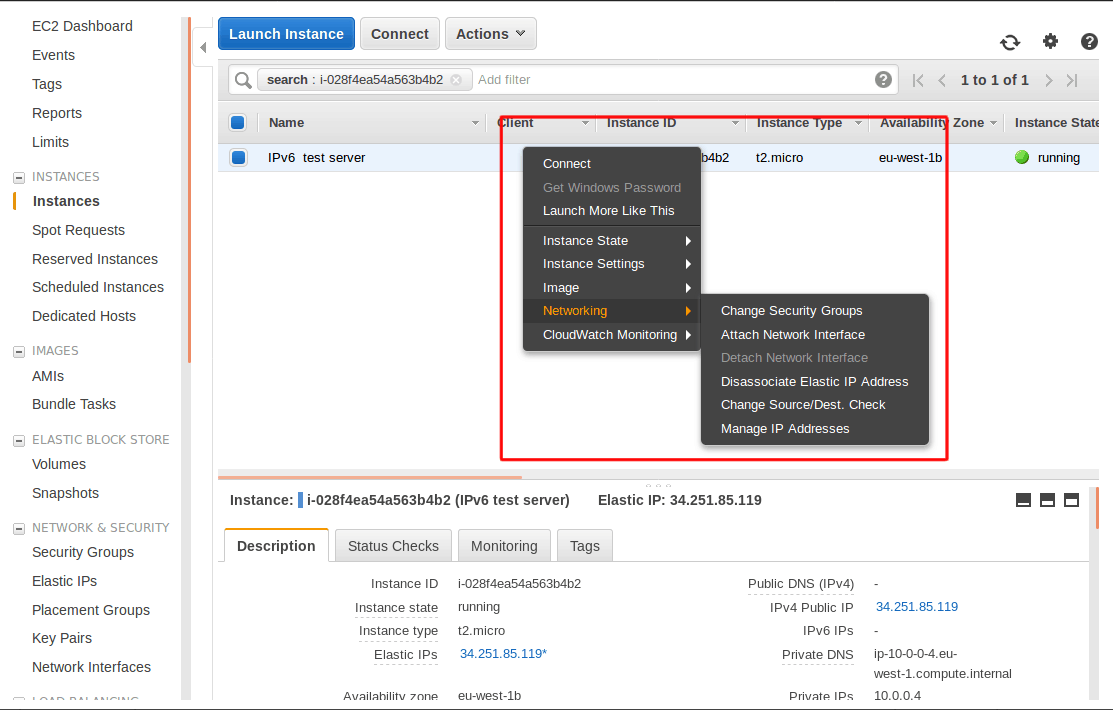
    1. Right click and go to the “Networking” tab and select “Manage IP Addresses”
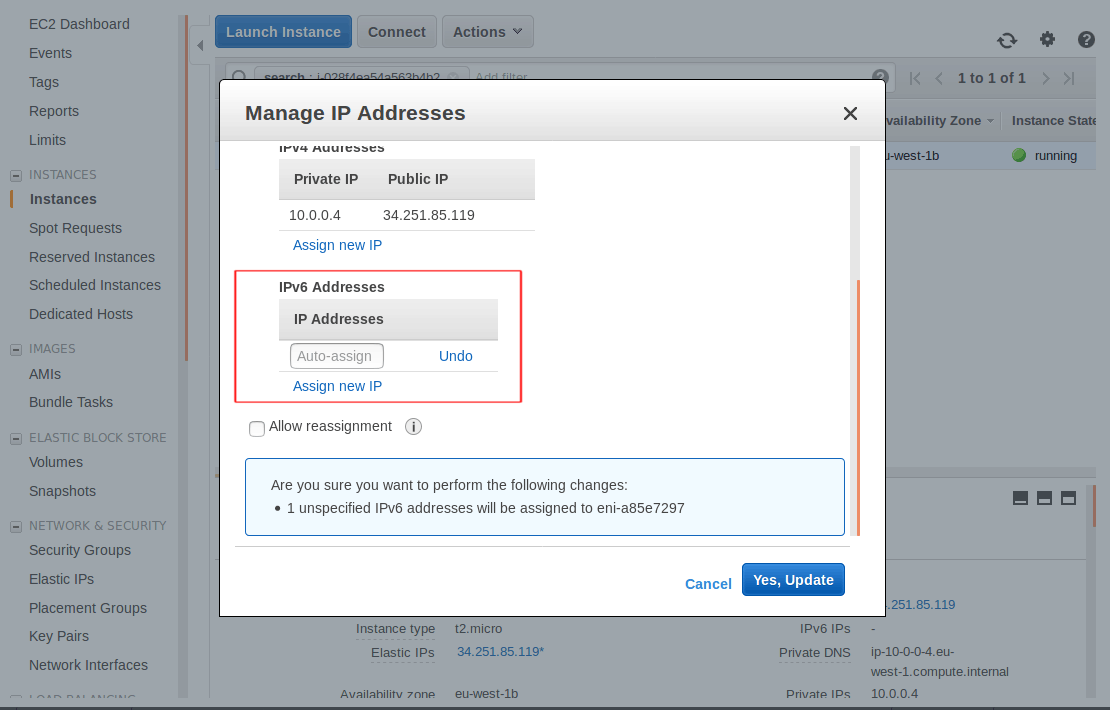
    2. Assign a new IPv6 address

Opening the manage IP addresses menu for my instance

Assigning a new IPv6 IP

Step 3: Listen in the Operating System

Each Operating System has a slightly different network set up and will need a different configuration.

If you are unsure what Operating System you are running you can find out by reading this file:

cat /etc/*-release

I use vim below but you can use nano if you prefer we don’t mind. 🙂

Ubuntu 16 clients

  1. Connect into the server on the command line over IPv4 as the admin user.
  2. Find your Network Interface name
    • You can see all running network interfaces by running ifconfig, in most situations there should be two interfaces. lo is for local networking (where the traffic doesn’t leave the server) and there will be another which is what you are looking for.
    • You can also see your interfaces via the current configs: cat /etc/network/interfaces.d/50-cloud-init.cfg
    • My interface is eth0 but it will depend on your instance type what interface name you have.
  3. Create a new configuration file for IPv6.
    • sudo vim /etc/network/interfaces.d/60-auto-ipv6.cfg
    • And add the following line to your file and save.
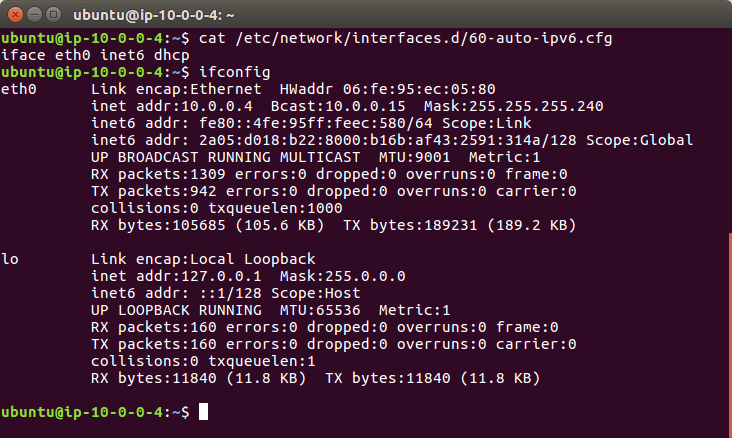
      • iface eth0 inet6 dhcp
    • If you are interested in what this line does, it binds to the interface (for me eth0) using the inet6 (IPv6) address family and uses DHCP (Dynamic Host Configuration Protocol) to get the servers IP address.
  4. And last of all to load in this new config
    • sudo service networking restart
    • OR sudo ifdown eth0 && sudo ifup eth0 replacing “eth0” with your interface name.

A configured Ubuntu 16 server

Ubuntu 14 clients

You will need to reboot your Ubuntu 14 system to load in the new static IPv6 address.

  1. Connect into the server on the command line over IPv4 as the admin user.
  2. Find out your Network Interface name
    • You can see all running network interfaces by running ifconfig
    • My interface is eth0 but it will depend on your instance type what you have.
  3. Edit the existing network interface file.
    • vim /etc/network/interface.d/eth0.cfg
    • And make sure it contains the below lines
    auto lo
    iface lo inet loopback
    
    auto eth0
    iface eth0 inet dhcp
            up dhclient -6 $IFACE
    • If you are interested in what these lines do, lines 1 and 2 set up a local loopback interface this guides traffic from the server to itself which sounds strange but is used often in networking.
    • Lines 3 and 4 starts networking on eth0 using DHCP (Dynamic Host Configuration Protocol) to get the servers IP address
    • Finally line 6 starts dhclient which handles DHCP with the -6 flag to get the IPv6 address.
  4. Reboot the server. sudo reboot

RedHat Enterprise Linux 7.4 and CentOS 7.4 clients

  1. Connect into the server on the command line over IPv4 as the admin user.
  2. On version 7.4 networking is managed by cloud-init. This is a standard tool for configuring cloud servers (like EC2 instances).
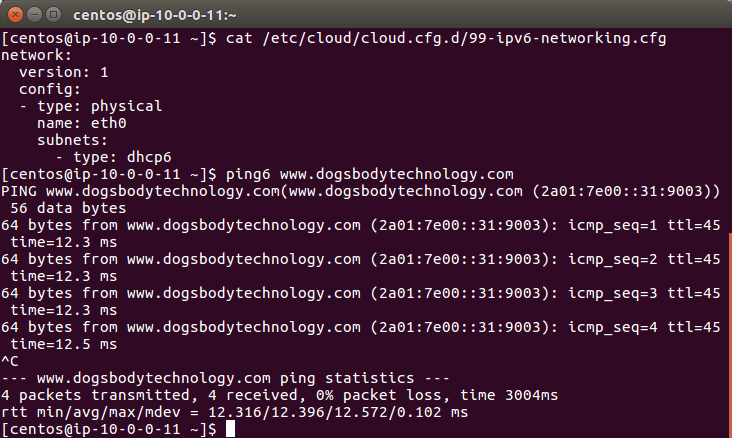
  3. Create a new config file in which we will enable ipv6 and add the below options.
  4. vim /etc/cloud/cloud.cfg.d/99-ipv6-networking.cfg
network:
        version: 1
        config:
        - type: physical
                name: eth0
                subnets:
                - type: dhcp6

A configured CentOS 7.4 server

RedHat Enterprise Linux 7.3 and CentOS 7.3 clients

  1. Connect into the server on the command line over IPv4 as the admin user.
  2. Edit the global network settings file
  3. vim /etc/sysconfig/network
    • Update the following line to match this. This will enable IPv6 for your system.
    • NETWORKING_IPV6=yes
  4. Edit the existing network interface file.
  5. vim /etc/sysconfig/network-scripts/ifcfg-eth0
    • Enable IPv6 for the interface
    • IPV6INIT=yes
    • Enable IPv6 DHCP so the server can automatically get its new IPv6 address
    • DHCPV6C=yes
    • Disable the Network Manager daemon so it doesn’t clash with AWS network services
    • NM_CONTROLLED=no
  6. sudo service network restart

Step 4: Run like you have never run before

You are set up, the complex bit is done. Now we are at the application layer.

  1. Test that your IP address is set up by running: ifconfig
    • You could see a line that starts “inet6 addr” and ends with “Scope: Global” this is your IPv6 address (which you can confirm by looking at the instance in the EC2 control panel).
  2. Test outbound connections work over IPv6: ping6 www.dogsbodytechnology.com
  3. We always use a server side firewall (along side the security groups) for the fine grain control it gives us on the server. It is essential that this firewall is updated to allow IPv6 connections.
    • A very common tool for maintaining firewall rules is iptables. This has an IPv6 equivalent ip6tables.
  4. Configure your web/app server software to listen to IPv6
    •  Below are some example configuration lines so these common applications will start listening on IPv6.
    • Apache
      • Listen to IPv6 traffic on port 80 from the IP “2001:db8::” Listen [2001:db8::]:80
    • NGINX
      • To start listening to all incoming IPv6 traffic on port 80 listen [::]:80;
      • In fact there is a flag that disables IPv4 connections  ipv6only=on
  5. To start using your domain name (example.com) you need to create “AAAA” records with your DNS provider. This DNS record type is specifically for IPv6 traffic so that they can find your server.

Conclusion

Well done for getting this far, I am glad we have both done our bit to bring IPv6 into this world.

If you have any questions please put them in the comments or contact us and we will be happy to get back to you  🙂

Feature image background by Eightonesix licensed Freepik.com & IPv6 Icon licensed CC BY 3.0.

Setting up IPv6 in your AWS VPC

This is the first part of a two part series on setting up IPv6 in Amazon Web Services (AWS).  This first part discusses setting up IPv6 in your AWS VPC.  The second part will discuss setting up IPv6 on your EC2 instances.

The IPv6 revolution is happening and you need to be a part of it, or you will be left behind running IPv4. Almost all major broadband service providers like BT and Sky provide IPv6 addresses by default. IPv6 and IPv4 are not compatible, and eventually IPv4 will be dropped altogether. Until that day dual stack set ups offer you the best of both worlds, readying you for the future.

Since last Christmas AWS have slowly been adding IPv6 support to more of their services and regions. However you need to actively opt in and set it up. These are my 6 steps to setting up IPv6 on AWS:

What is IPv6?

Internet Protocol version 6 (IPv6) is the most recent version of the Internet Protocol (IP), the communications protocol that provides an identification and location system for computers on networks and routes traffic across the Internet. IPv6 was developed […] to deal with the long-anticipated problem of IPv4 address exhaustion.

Wikipedia article on IPv6

Step 1: Pre-requisites

This guide assumes you have an existing AWS VPC set up and that you have full console access to your account.

Before you add IPv6 to your services it is worth making sure you can use it. Some older EC2 instances don’t yet support it. Check the docs for the table showing the EC2 generation and their IPv6 support status. You will need to re-size your EC2 instances to a supported instance type before you can fully set up IPv6.

Another catch is that some services including RDS do not support IPv6 yet, but do not fret as we are setting up a dual stack environment (supporting IPv4 and IPv6) and these services will continue working without issue over IPv4.

Step 2: Request an IPv6 range

Firstly we need to get an IPv6 range for your VPC. AWS give you a range of 4,722,366,482,869,645,213,696 different IPv6 IPs, to put this into perspective there are 4,294,967,296 total IPv4 IPs in the world!  :-O

  1. Back to the tutorial. Open the VPC management console, you can also find this by selecting the services menu at the top left and searching for “VPC”.
  2. In the navigation bar, on the left, select “Your VPCs”.
  3. Select the VPC you want to add IPv6 to.
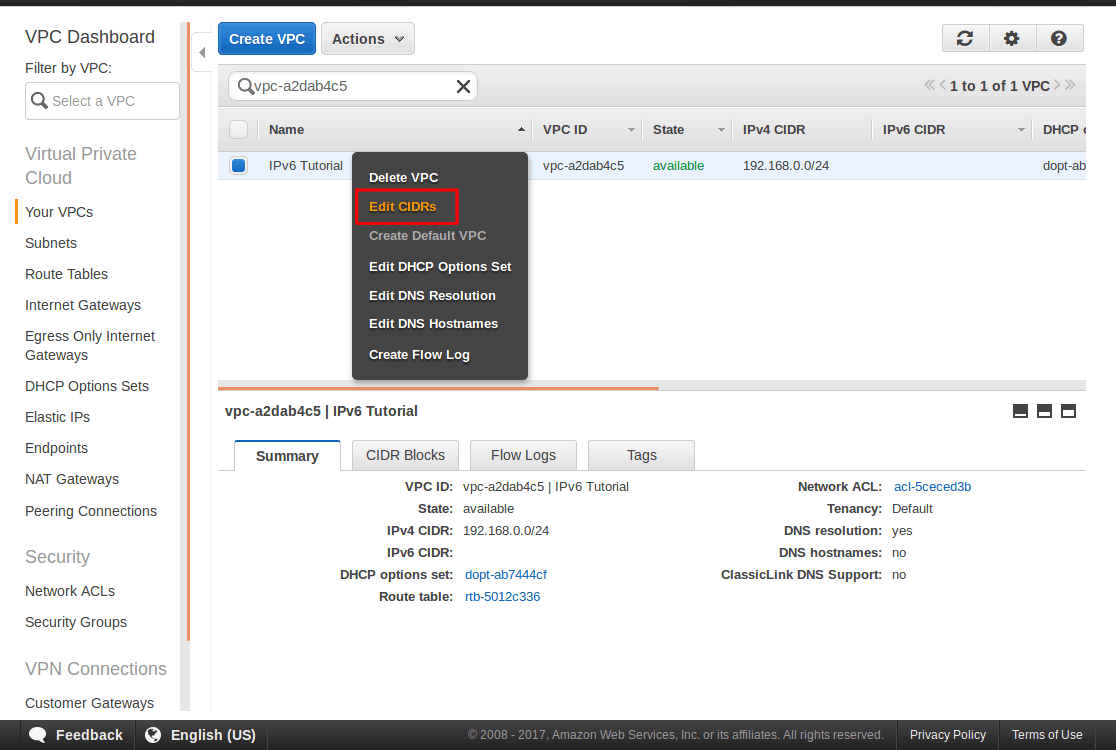
  4. Right click on the VPC and select “Edit CIDRs”.Step 4 selecting "Edit CIDRS"
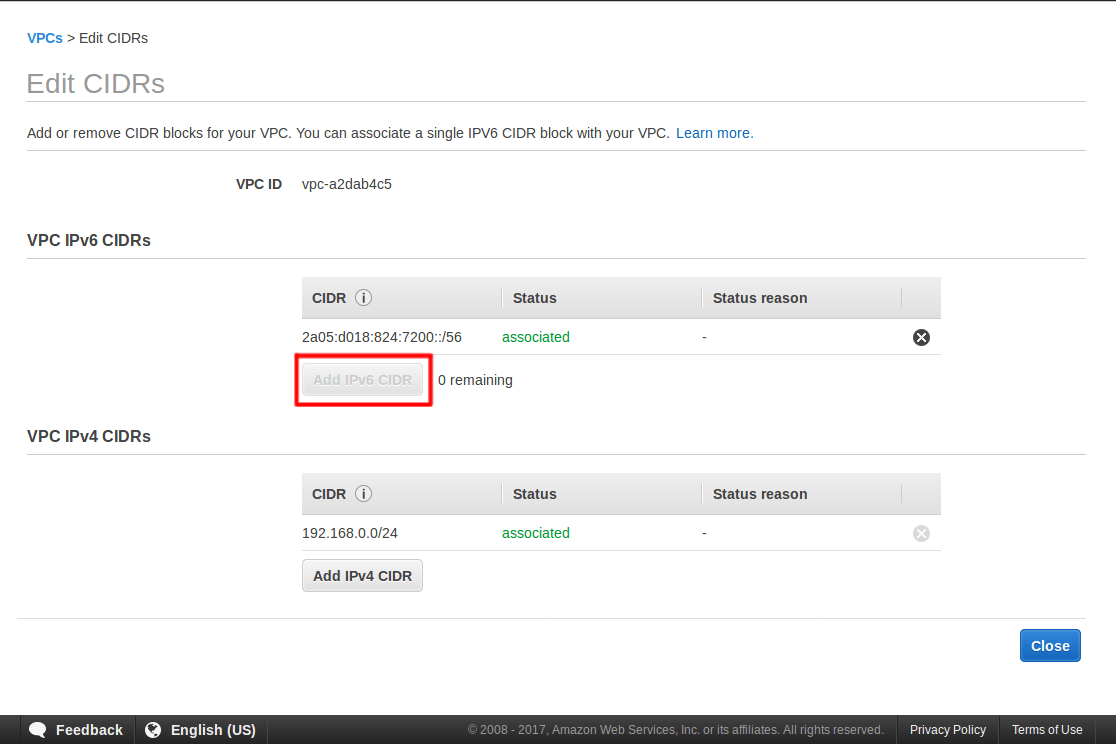
  5. Select Add IPv6 CIDR, it will then obtain a new IPv6 range for you and add it to your VPC.
  6. Select “Close” to continue.

Step 5 Adding a IPv6 CIDR

Step 3: Add IPv6 to your subnets

A subnet is a range of IP addresses. It makes routing traffic much simpler by pointing this range of IP’s in one direction rather than needing rules for each individual IP address. For example the IP address 203.0.113.76 is part of the 203.0.113.0/24 subnet range and routers on the internet will point all addresses in that range towards the owner of that range (Amazon for example). The /24 section indicates the size of the subnet, in this case it includes all IPs from 203.0.113.1 to 203.0.113.255.

This step adds the new IPv6 range to the subnets which your servers reside in.

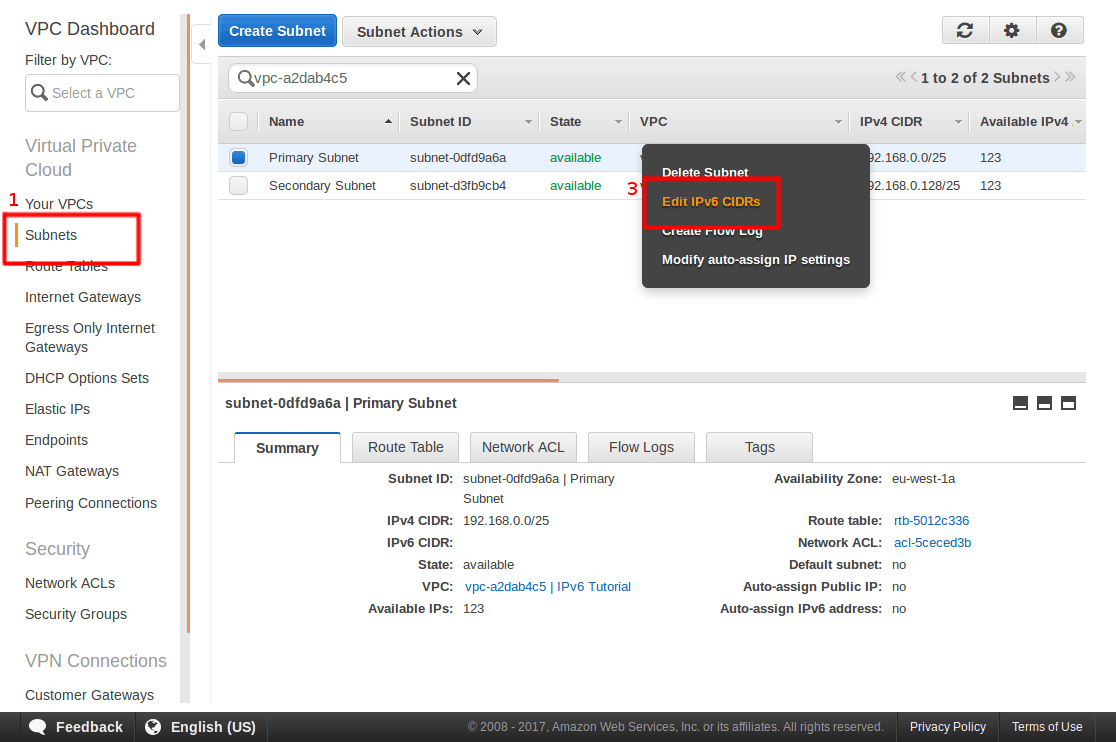
  1. In the navigation bar, select “Subnets”, this takes you to a page which lists all subnets in all of your VPCs. If you have multiple VPCs you will want to filter the subnet page by VPC, making it easier to see which subnets you need to add IPv6 to. (You can filter by VPC on every menu we will be looking at in this tutorial.)
  2. Select a subnet in your VPC
  3. Right click on it and select “Edit IPv6 CIDRs”Steps 1 and 3, configuring the subnet.
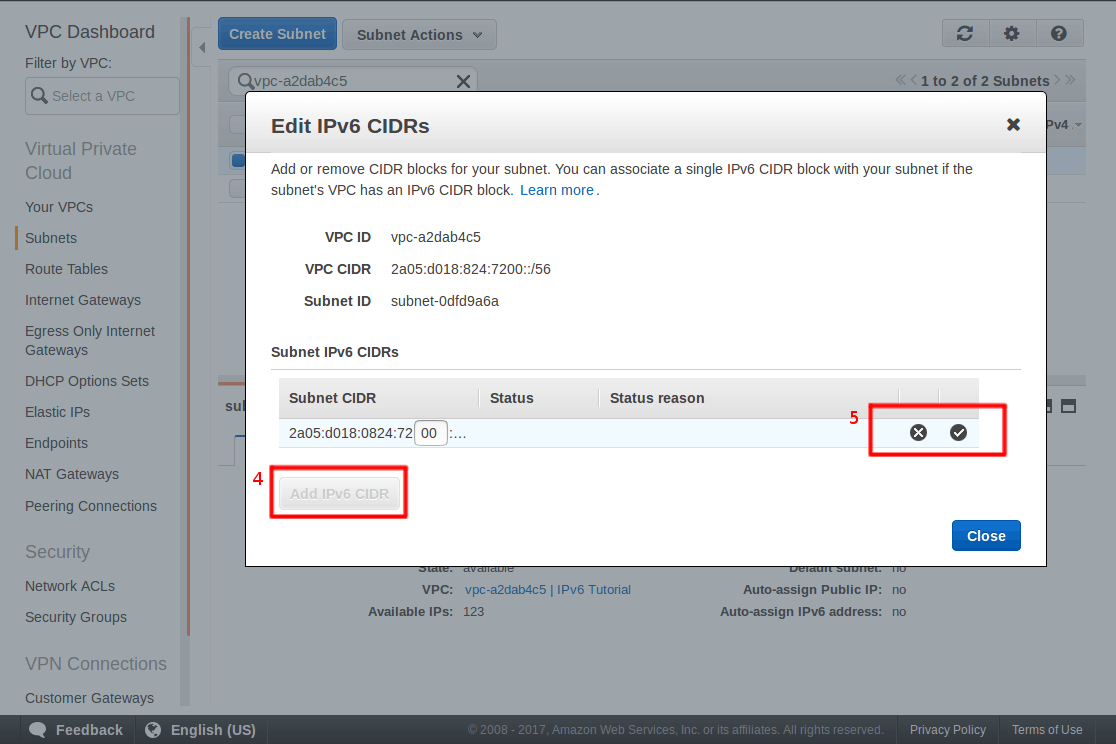
  4. Select “Add IPv6 CIDR”
  5. Press the tick icon that appears to the right of your new IPv6 range, this will associate it with the subnet.
  6. Close the menu.Steps 4 and 5, adding the new IPv6 range.
  7. Repeat items 2 to 6 for each subnet in your VPC

Step 4: Speaking to the internet

At this point we have set up our VPC with IPv6 traffic coming in. This section is about talking out to the internet and that starts with routing. The first part of routing is an Internet Gateway, this is an AWS service which provides network address translation. Simply it is a device which guides network traffic in the right direction on its way into the internet.

You may already have an Internet Gateway, if you do great you can skip to step 5.

  1. In the navigation bar, select “Internet Gateways”.
  2. Click “Create Internet Gateway” at the top.
  3. Give it a sensible name and press “Yes, Create” to save.

If you didn’t have an Internet Gateway before now, your servers would have only been able to speak to each other so be aware your servers can now talk to anyone on the Internet.

Step 5: Speaking to the IPv6 internet

The route table is telling all servers in your VPC this is the first hop on your journey, it passes internal traffic to your other servers, RDS instances, Elasticache instances etc and importantly it passes external traffic out to the Internet Gateway. That is what we are about to set up.

  1. In the navigation bar, select “Route Tables”.
  2. Select the route table attached to your VPC.
  3. Click on the “Routes” tab and then “Edit” the existing table
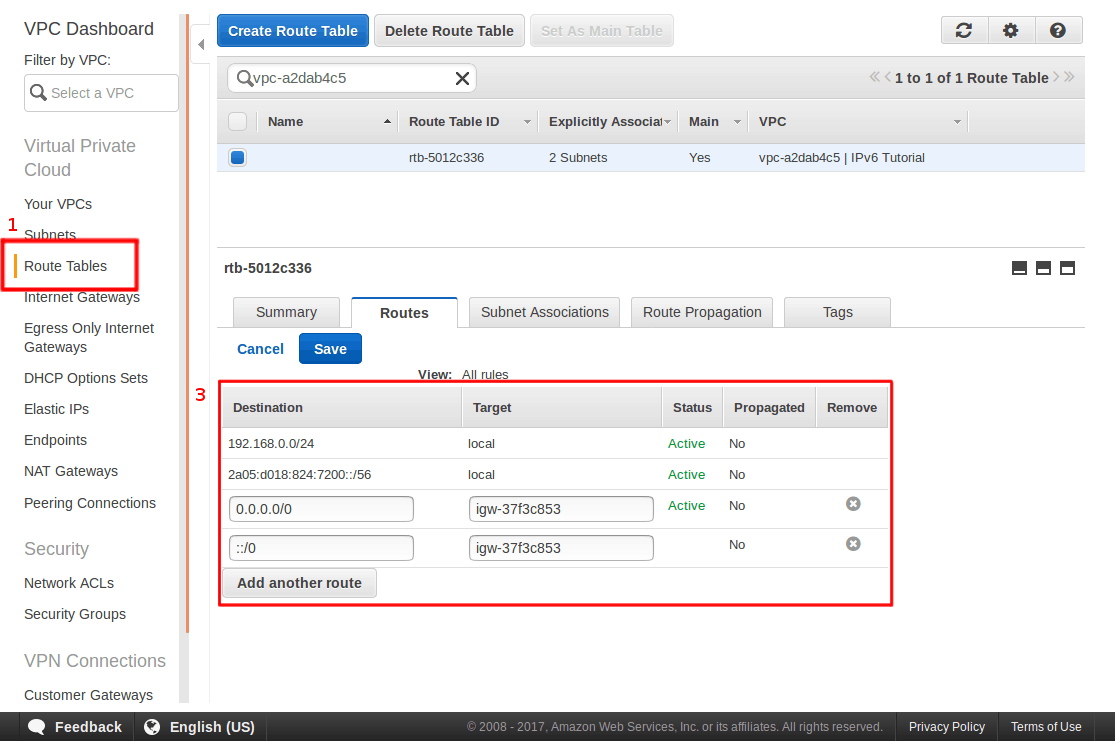
  4. Add in a rule for Destination “::/0” where the Target is your Internet Gateway.
    1. When you click in the target field it will automatically show you all available Internet Gateways
  5. If you have just created your first Internet Gateway you will also want to route IPv4 traffic out to the internet
  6. “Add another route” with the Destination of 0.0.0.0/0 and a Target of your Internet Gateway.
  7. Click save

::/0 means any IPv6 address, this is why it is at the bottom of your route table because it is catching all un-routed IPv6 traffic and passing it onto your AWS Internet Gateway.

Step 3, Adding new IPv6 routes.

Step 6: Network ACL

There is one final step at the network level, the Network Access Control List (ACL). It is one of many layers of security protecting your servers from attackers. The ACL lists both allowed and denied connections based in IP ranges, so we need to add IPv6. You may find that IPv6 has been configured on your ACL by AWS, in which case you can skip this step.

  1. In the navigation bar, select “Network ACLs”, it is under the “Security” subheading.
  2. Select your Network ACL; again you can filter by VPC if needed.
  3. Select the “Inbound Rules” tab and “Edit” the rules
    1. A little known fact about IPv6 is that it is prioritised over IPv4 traffic, if you have IPv6 set up people connecting in will prefer it over IPv4. This means your developers with their static IP addresses need their IPv6 address added as well as their IPv4 address. Just having their IPv4 record whitelisted will still leave them blocked.
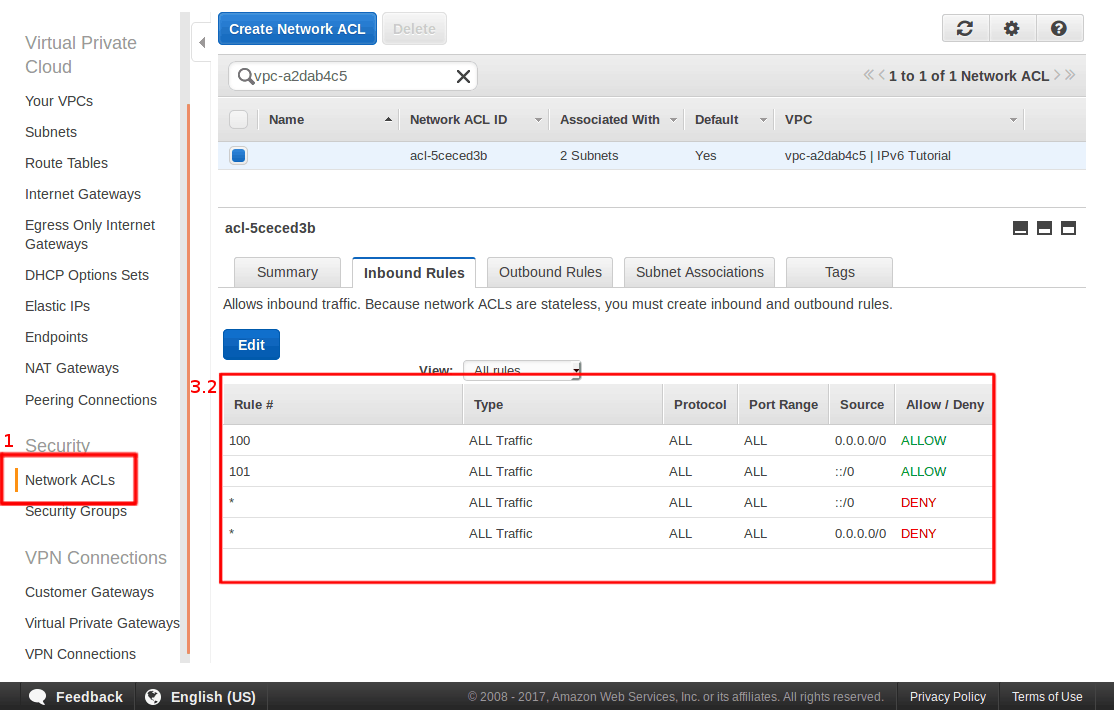
    2. With this in mind for each rule in your IPv4 inbound rules there should be one with an IPv6 “Source” field.
      1. As mentioned above ::/0 matches all IPv6 records so you can use it to mirror the 0.0.0.0/0 sources.
      2. Each rule needs a unique name, I iterated up by 1 as I went.A configured Inbound Rule set
  4.  Select the “Outbound Rules” tab and “Edit” the rules
    1. Set up new IPv6 rules mirroring IPv4, just as we did for the Inbound Rules.
  5. You will need to do items 3 and 4 for each Network ACL in your VPC, if you have more than one.

Conclusion

Congratulations you are now IPv6 ready! and I hope you learnt something new about VPC’s, I certainly learnt a lot researching this post. Please leave any questions in the comments or contact us and see how we can help you. 🙂

Now the first part of our IPv6 journey is complete, join us next time where I will show you how to configure the server itself to support this new IPv6 environment.

Feature image background by Eightonesix licensed Freepik.com & IPv6 Icon licensed CC BY 3.0.

Is your uptime in your control?

People have always relied on 3rd parties to provide services for them, and this is especially true in the technology sector. Think server providers, payment providers, image hosting, CSS & JS libraries, CDNs etc. The list is endless. Using external providers is of course fine, why re-invent the wheel after all? You should be concentrating on what makes your product/service unique, not already-solved problems. (It’s also the Linux ethos!)

Why should you care?

With that said, relying on other people’s services is obviously a problem if their service isn’t up. Luckily, most big service providers, and lots of smaller providers too, have status pages where they will provide the current status for their systems and services. (see ours here). These status pages are great during an unforeseen outage, as you can get the latest info, such as when they are expecting the issue to be fixed, without having to contact their support team with questions, at a time when their support is probably under a lot of strain due to the outage in question.

Lots of status pages even allow you to subscribe to updates, meaning you’ll receive an email or SMS (or even have them call a web-hook for an integration into your alerting systems) when there is an issue.

As much as everyone hates outages, they are unfortunately a part of life, and when it’s another service provider’s outage, there isn’t much you can do. (Ideally you should never have a single point of failure, i.e. high availability, but that is a blog post for another time).

What can you do about it?

However, not all outages are unforeseen, and lots of common issues are easy to prevent ahead of time with some simple steps:

    1. Monitor the status page / blogs of your service providers for warnings of future work that could effect you, and make a record of it
    2. Subscribe to any relevant mailing lists. These not only let you know about issues, but allow you to take part in a discussion around the issue and it’s effects
    3. Set up your own checks for service providers that don’t have a status page and/or an automated reminder system (we can help with this).
    4. Make sure that reminder notifications are actually being seen, not just received. You could have all of the warning time in the world, but if nobody reads the notification, you can’t action anything.

Other things to consider

As mentioned above, your customers are likely to be more forgiving of your outage if it is somebody else’s fault, but they’re not gonna be happy if it’s your fault, and they are really not gonna be happy if it was easily preventable.

The two most common problems that fall into this bracket are domain name and SSL certificate renewals. Every website needs a domain name, and massive amounts of sites use SSL in at least some areas. If your domain name expires, your site could become unavailable immediately (depending on your domain registrar and how nice they are).

SSL certificate expiries can also cause your site to become unavailable immediately. On top of this, browsers will give nasty warnings about the site being insecure. This is likely to stick in the mind of some visitors, meaning it could damage your traffic and/or reputation even after the initial issue has been resolved. It’s also really easy to set up checks for these two things yourselves.

If you don’t want to set these up, then we handle this for you as part of our maintenance packages. Just contact us and we can get this set up for you right away.

Client support vs PCI 3.1 Compliance

Back in December 2015 the Payment Card Industry Security Standards Council (PCI SSC) agreed it was time to start disabling support for old and insecure SSL protocols.

TLS 1.0 needs to be switched off before the 30 June 2018.

While many of the old SSL protocols have been disabled now due to vulnerabilities such as POODLE and Heartbleed this will be the first time a protocol has been disabled that is still being used by some old browsers without a known vulnerability.

A large number of older clients will break when you disable TLS 1.0, including:

  • Android 4.3 and older
  • Internet explorer 10 and older
  • Java 7 and older
  • Safari 5.1.9 / OS X 10.6.8
  • Safari 6.0.4 / OS X 10.8.4

We recommend you look at your analytics and see how many customers will be affected before making this change.

If you are in a position where you cannot disable TLS 1.0 yet, there are alternatives, your PCI provider will accept a plan to defer this work up to the 30 June 2018. Another solution could be separating your checkout pages from your website, this way older browsers can still browse most of you site.

Check out the PCISSC blog post for further reading.

Are you are concerned about disabling TLS 1.0? Running into PCI compliance issues? Unhappy with your site security? Drop us a message and see how we can help you.

Feature image made by costculculator licensed CC BY 2.0.

Quick/Easy Wins For Your Server

There are three main stages in a servers lifetime; building/configuring, usage, and being decommissioned, with the usage section usually being by far the largest section in terms of time. For this reason, it’s obviously important to make sure that the server is optimally configured, secure and able to be reproduced/replaced easily in the event of a disaster.

Depending on the company owning/running them, servers can range from clean and efficient pieces of machinery, to rusty old lawnmowers that need a bit of coaxing to start. There are some quick wins that offer a chance to move yourself from the second extreme into the first. By carrying out a fairly quick audit covering some main areas, you can get yourself some great returns for not much work.

Security

If you are running an insecure server on today’s internet, it’s not a question of if you have a system security compromise, it’s a matter of when. One of the first things we check upon carrying out a server audit is if the system is being actively patched, what levels of patch are being applied (all updates vs just security vs none at all), and how often the system is being patched. Furthermore, we also check the if non-system software, such as CMSs like WordPress/magento, or other utilities like phpMyAdmin, are being kept up to date. Actively keeping all system software up to date is one of the easiest things you can do in keeping systems secure, but it makes the job of a potential attacker much, much harder.

Another easy-win for security is the use of a firewall. Firewalls provide a set of rules determining who may connect to your server and on what ports/protocols. This allows you to greatly reduce your attack surface, by only exposing services that absolutely need to be exposed. For example, on a web server, you’d really want to expose ports 80 and 443, for HTTP and HTTPS respectively. However you may also want to expose port 22 (SSH) for remote management. This can be locked down to only allow certain IP addresses for this management. Depending on how security conscious you are, outbound firewalling can also be implemented, allowing you to control what other systems on the internet your server may talk to.

Backups

Everybody knows what backups are, but sadly not everyone understands their importance. Backups are critically important, as they allow you to retrieve your data should the worst happen with your server and it becomes inaccessible. Mistakes also happen, and having easy to access backups can save your so much time by allowing you to just roll back your changes, instead of taking a long time trying to unpick your errors and rectify them, often whilst under the pressure of having a broken server/websites/application etc.

The granularity of backups is also an important aspect to consider. Many server providers offer a backup service, but what people often fail to realise is that if you want to restore these backups, you have to restore everything, you don’t get to decide what’s rolled back and what’s kept. This can be a real pain if you have to lose a weeks worth of work just because you updated the wrong row in a table. This is why we also recommend that separate backups are kept for each “area” of data. For simple web server builds, we would typically configure backups of a sites web directory, and separate backups of the site’s MySQL databases(s).

It’s also important to keep these off-site; backups aren’t much use if they’re stored on the same server they’re backing up.

Configuration/optimisation

There are a huge number of configuration tweaks and changes that can be made in order to get more performance from your server, some being one-line changes, some involving a complete rebuild of your infrastructure. There are some however that can be done in a matter of minutes that can have huge benefits going forward. The main one we’re going to mention is resource limits.

Popular web-servers, such as Apache and nginx, allow you to set how much of the total system resources they are allowed to consume. In some cases it may seem obvious that you want them to be able to consume as much as they want for the best performance right? Wrong. If a server gets really busy, say your cat video has gone viral, there is a good chance people are going to be asking your server to work harder than it’s able. If you do not set appropriate resource limits, your server is going to use up every last drop of available memory/CPU, which results in it becoming unusably slow, and processes often get killed in order to free up memory.

We’ve quite often seen the MySQL database server process get killed, as it can use up a lot of memory. If your database goes offline, you’re gonna have a bad day.

If any of the above sounds like something you want to do, but you’re not sure where to start, then contact us and we can certainly help you with the points mentioned, along with many other aspects that we check in our server audits.

Feature image by Crystian Cruz under the CC BY-ND 2.0 license.

HTTP/2

Switching a site from HTTP to HTTPS

We love HTTPS and with its Security, Speed, SEO and Accessibility you should upgrade now!

Having helped customers through this process many times we have learnt a thing or two about how to make the process go smoothly. So here is our …

4 step HTTPS upgrade guide


1) Get a certificate

You can get an SSL certificate from 100’s of different resellers, we have a hefty spreadsheet to keeps track of the best.

There are many types of SSL certificate from various Certificate Authorities. For basic domain validated certificates we are a big fan of Lets Encrypt.

If you don’t know what certificate you need you can read our other articles (link above) or contact us and we’ll be glad to help.

2) Set up your web server to listen to HTTPS

This is an important step I wanted to split out, this doesn’t mean stop using HTTP. Just because you are ready for HTTPS doesn’t mean your site is and jumping over immediately can often cause unforeseen issues.

All good web-servers can listen to multiple ports at once so you can continue running your site over HTTP while you are working on HTTPS.  If this process takes more than a day then you will probbaly want to firewall your new site off from the rest of the internet until it’s up and working as you wish.

At this step you can set up all sorts of new cool technologies. If you ever thought HTTPS was slower than HTTP wait until you try HTTP/2.0.

3) Configure the site to use HTTPS

This is when you fix those unforeseen issues I mentioned earlier, people often forget that HTTPS is very strict when it comes to downgrading the connection and will block anything loaded over HTTP. This often ends up with the page missing CSS or Javascript.

Another catch that is often missed is getting your site to generate links as HTTPS. If the site continues to generate HTTP links each visitors click and item load happens twice once to redirect to HTTPS and again to load it over HTTPS, it doubles the traffic and load time of your site.

One common concern with HTTPS is that you lose all referral information when a user clicks from an HTTPS to a HTTP site. There are ways around this, we include the <meta name=”referrer” content=”always”> tag in all of the HTML on our site so we don’t lose this, but you can only do this on sites that you control.

4) Configure your web server to redirect to HTTPS

The last step, set up a permanent redirect to upgrade all of your traffic to browse your site via HTTPS. Permanent redirects differ from other redirects as the redirection is cached as well as having some SEO benefits.


If you are interested in more information or would like help with your migration then please feel free to drop us a message and see how we can help you upgrade.

SEO (Search Engine Optimization) Beginners Guide

What is SEO?

Search Engine Optimisation is a process to improve the visibility or ranking of a website in search engines. By appearing earlier or higher ranked on the search results page a site will appear more frequently in the search results list resulting in more visitors to that website and ultimately these visitors could be converted into customers.

Most people can at least do the basic Search Engine Optimisation on their own website, without having to pay an experts, using the many useful guides online. Even small tweaks can make a big difference.

With this in mind we are not going to rewrite the book on SEO please find useful beginner guides to SEO we find make a good starting point: