NGINX – Optimising Redirects

We’re a big user of NGINX as you can probably imagine. It’s been fascinating to see it’s growth over the last 10 years and we love it’s quick adoption of new standards.

Optimisations are always important, especially at scale; we’re always looking for the cleanest way to do things and redirects are definitely one of the easiest and quickest wins.

Redirects are used when you want to send users to a different URL based on the requested page.  Some popular reasons to do this are:

  • Redirect users from a short memorable URI to a corresponding page
  • Keep old URLs working after migrating from one bit of software to another
  • Redirect discontinued product pages (returning 404s) to the most closely related page

Redirects can typically be done in using rewrite or  return with the addition of map for large arrays of redirects. Lets look at the differences….

Using ‘rewrite’ for redirects

Rewrite isn’t all bad, it’s very powerful but with that comes a large CPU overhead as it uses regex by default.

Consider the following rule to redirect browsers accessing an image to a separate subdomain; perhaps a CDN…

rewrite ^/images/(*.jpg)$ http://static.example.com/$1 permanent;

Using ‘return’ for redirects

A redirect is as simple as returning a HTTP status code so why not do just that with the return option.

If you have to redirect an entire site to a new URL then it can be simply done with…

server {
    server_name oldsite.example.com;
    return 301 $scheme://newsite.example.com$request_uri;
}
server {
    server_name newsite.example.com;
    # [...]
}

… remember that http and https configs can easily be separated to allow the http site to only forward on requests ensuring that it’s impossible for anyone to access your site insecurely…

server {
    listen 80;
    server_name www.example.com;
    return 301 https://www.example.com$request_uri;
}
server {
    listen 443;
    server_name www.example.com;
    # [...]
}

Using ‘map’ for redirects

If you’ve only got a handful of redirects then using rewrite to do this isn’t a big deal.  Once you’re talking about hundreds or thousands of redirects it’s worth looking to use a map.

Here’s an example configuration using a map and return directive to set-up two redirects.

Depending on how many URLs you’re redirecting you’ll need a different value for map_hash_bucket_size.  I’d stick with powers of 2, a config test (nginx -t) will warn you if your value is too small.
$uri is an NGINX variable.
$new_uri is the new variable that we’re creating, if you’ve got multiple sites you’ll need to use different variable names.

map_hash_bucket_size 128;
map $uri $new_uri {
    /test-to-rewrite /test-rewritten;
    /test2-to-rewrite /test2-rewritten;
}

server {
    server_name example.com;
    if ($new_uri) {
        return 301 $new_uri;
    }
#...
}

For reference, here’s the equivalent syntax using rewrite.

server {
    server_name example.com;
    rewrite ^/test-to-rewrite$ /test-rewritten permanent;
    rewrite ^/test2-to-rewrite$ /test2-rewritten permanent;
#...
}

Testing map performance

Before testing this my expectation was that there would be a cross over point after which using a map was beneficial.  What I found was that a map is suitable for any number of redirects but it’s not until you have a large number that it’s essential.

Test conditions

  • Ubuntu 18.04 on a AWS c5.large
  • nginx v1.18.0
  • Used ApacheBench to make 10k local requests with 500 concurrent connections

I ran each test 3 times and used the average in the numbers below.  I was measuring:

  • Time taken to complete all of the requests
  • Memory usage with NGINX stopped, running and running after the test

I’m happy this can show the relationship between the number of redirects and the performance differences between a map and rewrite.  Though it won’t represent your exact set-up.

Single redirect

The first thing I tested using both the rewrite and map configuration was a single redirect.

The time to complete these requests was comparable.  Both round to 0.42s with the map being a few hundredths of a second slower.  I believe this is within the errors of my testing.  The memory usage of running NGINX was too close to separate, fluctuating between 3-6M.

Large (83k) redirects

After that I tested what I’d consider the other extreme.  I pulled 83k lines out of the dictionary file and set-up redirects for them.  I ran the test against multiple different words.  This shows how the number of preceding redirects affects the time to complete the requests.

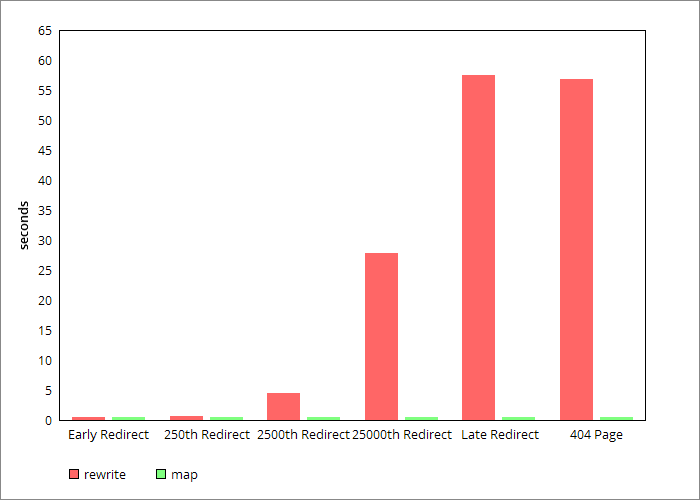
  • Abdomen – which appears early in my redirects had comparable times (the average over the 3 test runs is actually identical)
  • Absentee – the 250th redirect took 0.66s with rewrite rules and 0.42s with the map
  • Animated – the 2500th redirect took 4.43s with rewrite rules and 0.42s with the map
  • Evangelising – the 25000th redirect took 27.86s with rewrite rules and 0.42s with the map
  • Zing – which appears late in my redirects took 57.54s with rewrite rules and 0.42s with the map
  • The 404 page I was testing – this represents load times of any small static page below the redirects in the config, it took 56.89s with rewrite rules and 0.43s with the map

Graph showing response time for various redirects

The time to process each different redirect was effectively constant when using a map.  Using rewrite the time to process a redirect is proportional to the number of rewrite rules before it.

Memory usage was also noticeably different.  I found that the increase due to running NGINX was ~16M for the map and ~66M for the rewrites.  After the test had run this increased by a few megabytes to ~19M and ~68M.

250 redirects

I wanted to check if the sheer number of rewrites was slowing things down.  I cut the config down to just the first 250 redirects.  This significantly reduced memory usage.  The time taken for requests to the Absentee redirect was negligibly different from when there were 83k redirects.

Fewer requests

I ran an extra test with 100 requests (rather than 10k) and 5 concurrent connections (rather than 500).  This is also a closer approximation to a single user accessing a webpage.  The time taken to access the Zing redirect was 0.55s (rather than 57.65s).  I’m happy that this shows the time for a single request is effectively constant.

Conclusion

For a large number of redirects a map is both faster and more memory efficient.  For a small number of redirects either rewrite or using a map is acceptable.  Since there’s no discernible disadvantage to a map and you may need to add more redirects in the future I’d use a map when possible.

Give us a shout if we can help you with your NGINX setup.


Feature image by Special Collections Toronto Public Library licensed CC BY-SA 2.0.

UK and EU

Infographic: How to keep your .EU domain after Brexit

Following the withdrawal of the UK from the European Union on 01 February 2020, many owners of .EU domains based in the UK will no longer be eligible to own their domains.

If you own a domain ending .eu then you have until 01 January 2021 to ensure that it is correctly registered else it will be taken away from you.

What should I do?

You must check that the domain is registered to a European Union citizen, location or legal entity.

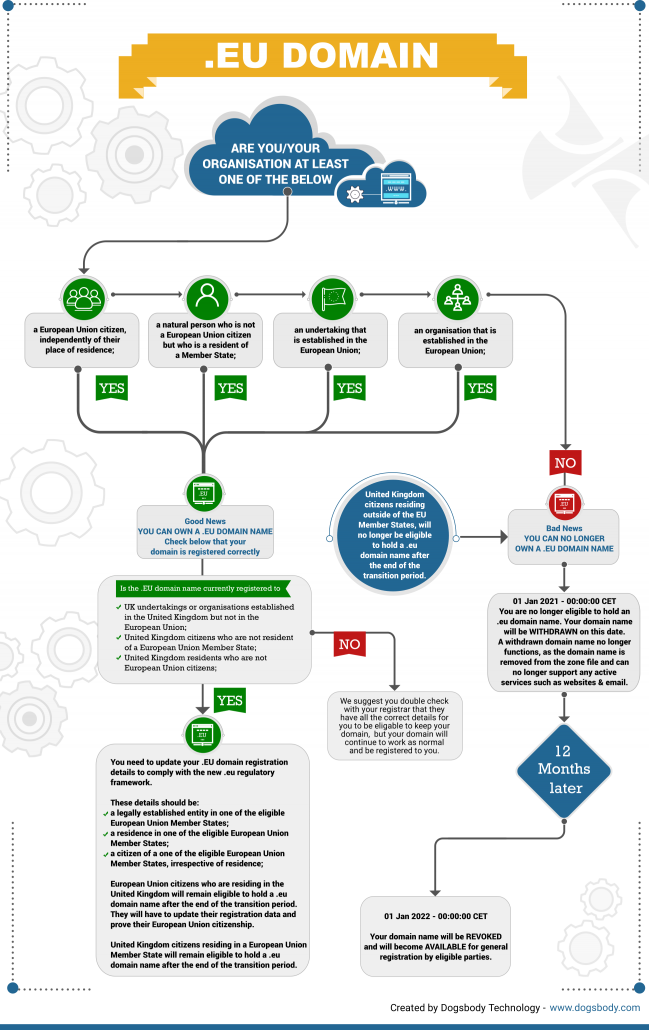
You can check the specifics on the EURid website or we have made the following handy infographic to get you started…

Flowchart of What happens to .eu domains after the UK leaves the EU

Why is this happening?

Due to the UK leaving the EU (commonly called Brexit), many UK-based owners of .EU domains no longer meet the .EU eligibility requirements.

The following are eligible to register .EU domains:

  • a European Union citizen, independently of their place of residence;
  • a natural person who is not a Union citizen and who is a resident of a Member State;
  • an undertaking that is established in the Union; or
  • an organization that is established in the Union, without prejudice to the application of national law.

Timeline

01 February 2020, the United Kingdom left the European Union. The withdrawal agreement provides for a transition period until 31 December 2020.

01 October 2020, EURid will e-mail any UK based owners of .EU domain names that they will lose their domain on 01 January 2021 unless they demonstrate their compliance with the .eu regulatory framework by updating their registration data before 31 December 2020.

21 December 2020, EURid will email all UK based owners of .EU domains who have not demonstrated continued compliance with the eligibility criteria about the risk of forthcoming non-compliance with the .eu regulatory framework.

01 January 2021, EURid will again email all UK based owners of .EU domains that their domain names are no longer compliant with the .eu regulatory framework and are now withdrawn. Any UK registrant who did not demonstrate their eligibility will be WITHDRAWN. A withdrawn domain name no longer functions, as the domain name is removed from the zone file and can no longer support any active services (such as websites or email).

01 January 2021, EURid will NOT allow the registration of any new domain name by UK registrants. EURid will also not allow either the transfer, or the transfer through update, of any domain name to a UK registrant.

01 January 2022, all the affected domain names will be REVOKED, and will become AVAILABLE for general registration. Their release will occur in batches from the time they become available.

I own a .EU domain and meet this criteria

Great! but don’t celebrate just yet. It is vital that you go and check that your domain has the correct details against it. EURid can only see the information in your domain registration so ensure that these details match the criteria.

I own a .EU domain but don’t meet this criteria

Here’s where things start to get tricky.

Obviously, if you do have a trusted person (a co-director) or second location within the EU then the easiest thing would be to move your domain to their details.

You can go and setup an office abroad! We have heard of people becoming an e-resident of Estonia, which maybe a little overkill but does come with some other added EU advantages.

Some registrar’s are allowing you to use them as a proxy for registering a .EU domain. Their details will be the official domain details with their promise to pass correspondence onto you.


If any of this is too much for you then give us a shout, we are here to help.

Please feel free to share this infographic with anyone you feel may find this useful using the buttons below.

Feature image by Elionas2 under Pixabay Licence.

A short guide to MySQL database optimization

MySQL is a very popular open source database, but many install it and forget about it. Spending a little time on MySQL database optimization can reap huge returns …

In this article, I want to show you a couple of the first places you should head, when you need to pinpoint bottlenecks or tweak the MySQL configuration.

MySQL slow log

The slow log, will log any queries that take longer than a given number of seconds.

This can help you to identify poorly written or demanding queries.  You can then refactor them or use concepts like “indexes” to speed them up.

It’s often helpful to start with a high “long query time”, to just flag up the longest queries and then gradually reduce it, as you deal with each one in turn.

To enable the slow log, create the following /etc/mysql/mysql.conf.d/mycustomconfigs.cnf or add the following lines to your my.conf file…

[mysqld]
slow_query_log=true
long_query_time=1
slow-query-log-file=/var/log/mysql/mysql-slow

… then restart MySQL, to load in the new values.

Improve the query

Once you’ve found a slow query, it’s worth considering if there is a simpler way to get the same information.

If you can improve the performance of the query you might be able to skip looking into why the old one was slow.

Explain/Describe

If you’re still looking to improve your query, we need to dig into how MySQL is actually running the query and why it’s slow.  This will give us a better idea how to fix it.

For these examples I ran a few basic queries against this auto generated employee data.

Let’s suppose your slow query is:

SELECT AVG(hire_date) FROM employees WHERE emp_no IN (SELECT emp_no FROM dept_manager)

To see how it will be executed, prefix it with EXPLAIN:

mysql> EXPLAIN SELECT AVG(hire_date) FROM employees WHERE emp_no IN (SELECT emp_no FROM dept_manager);
+----+-------------+--------------+------------+--------+---------------+---------+---------+-------------------------------+------+----------+------------------------+
| id | select_type | table        | partitions | type   | possible_keys | key     | key_len | ref                           | rows | filtered | Extra                  |
+----+-------------+--------------+------------+--------+---------------+---------+---------+-------------------------------+------+----------+------------------------+
| 1  | SIMPLE      | dept_manager | NULL       | index  | PRIMARY       | PRIMARY | 8       | NULL                          | 24   | 100.00   | Using index; LooseScan |
| 1  | SIMPLE      | employees    | NULL       | eq_ref | PRIMARY       | PRIMARY | 4       | employees.dept_manager.emp_no | 1    | 100.00   | NULL                   |
+----+-------------+--------------+------------+--------+---------------+---------+---------+-------------------------------+------+----------+------------------------+
2 rows in set, 1 warning (0.00 sec)

It’s worth having a quick look at the documentation on the output format.  Three of the columns to check are:

  • key – is the index that will be used, the one you’d expect?
  • rows – is the number of rows to be examined as low as possible?
  • filtered – is the percentage of results being filtered as high as possible?

Suppose we’re regularly making the following query:

SELECT * FROM employees WHERE gender = 'M'

This has type: ALL meaning that all rows in the table will be scanned.

It therefore makes sense here to add an index.

After doing so, the type changes to ref – MySQL can simply return the rows matching the index rather than checking every row.

As you’d expect this halves the number of rows:

mysql> EXPLAIN SELECT * FROM employees WHERE gender = 'M';
+----+-------------+-----------+------------+------+---------------+------+---------+------+--------+----------+-------------+
| id | select_type | table     | partitions | type | possible_keys | key  | key_len | ref  | rows  | filtered  | Extra       |
+----+-------------+-----------+------------+------+---------------+------+---------+------+--------+----------+-------------+
| 1  | SIMPLE      | employees | NULL       | ALL  | NULL          | NULL | NULL    | NULL | 299025 | 50.00    | Using where |
+----+-------------+-----------+------------+------+---------------+------+---------+------+--------+----------+-------------+
1 row in set, 1 warning (0.00 sec)

mysql> CREATE INDEX gender ON employees(gender);
Query OK, 0 rows affected (0.97 sec)
Records: 0 Duplicates: 0 Warnings: 0

mysql> EXPLAIN SELECT * FROM employees WHERE gender = 'M';
+----+-------------+-----------+------------+------+---------------+--------+---------+-------+--------+----------+-------+
| id | select_type | table     | partitions | type | possible_keys | key    | key_len | ref   | rows   | filtered | Extra |
+----+-------------+-----------+------------+------+---------------+--------+---------+-------+--------+----------+-------+
| 1  | SIMPLE      | employees | NULL       | ref  | gender        | gender | 1       | const | 149512 | 100.00   | NULL  |
+----+-------------+-----------+------------+------+---------------+--------+---------+-------+--------+----------+-------+
1 row in set, 1 warning (0.01 sec)

Third Party Tools

I should mention, that there are a bunch of tools that can help you find bottlenecks and really hone your MySQL database optimization techniques.

For websites written in PHP, we’re big fans of New Relic APM. This tool will allow you to sort pages based on their load time.  You can then dig deeper into whether the application code or database queries have the most room for improvement.

Once you’ve narrowed things down, you can start implementing improvements.

It’s worth having a search for other application monitoring providers to see if tools such as Datadog or DynaTrace better suit you.

MySQL Tuner

MySQL Tuner is a tool which looks at a database’s usage patterns to suggest configuration improvements.  Make sure you run it on a live system, that has been running for at least 24 hours.  Otherwise it won’t have access to enough data to make relevant recommendations.

Before you download and use the tool I’ll echo it’s warning:

It is extremely important for you to fully understand each change you make to a MySQL database server. If you don’t understand portions of the script’s output, or if you don’t understand the recommendations, you should consult a knowledgeable DBA or system administrator that you trust. Always test your changes on staging environments, and always keep in mind that improvements in one area can negatively affect MySQL in other areas.

Once you run MySQL Tuner, it will login to the database, read a bunch of metrics and print out some recommendations.

It’s worth grouping the related ones and reading up on any you haven’t come across.  After that you can test out changes in your staging environment.

One common improvement is to set skip-name-resolve.  This saves a little bit of time on each connection by not performing DNS lookups.  Before you do this make sure you aren’t using DNS in any of your grant statements (you’re just using IP addresses or localhost).

Your friendly SysAdmins

Of course, we are also here to help and regularly advise customers on changes that can be made to their infrastructure.

Give us a shout if you think we can help you too.


Feature image by Joris Leermakers licensed CC BY-SA 2.0.
Exploring character encoding types

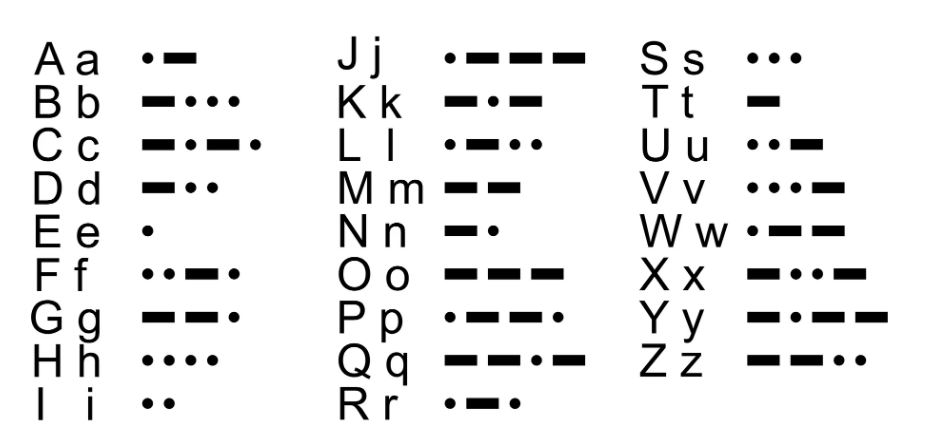
Morse code was first used to transfer information in the 1840’s.  As you’re probably aware, it uses a series of dots and dashes to represent each character.

Computers need a way to represent characters in binary form – as a series of ones and zeros – equivalent to the dots and dashes used by Morse code.

ASCII

A widely used way for computers to encode information, is ASCII (American Standard Code for Information Interchange), created in the 1960’s.

ASCII defines a string of seven ones and zeros that represent the letters A-Z, upper and lowercase as well as numbers 0-9 and common symbols. 128 characters in total.

8 bit encoding

As you’d expect, ASCII is well suited for use in America, however it’s missing many characters that are frequently used in other countries.

For example, it doesn’t include characters like é or £ & €.

Due to ASCII’s popularity, it’s been used as a base to create many different encodings.  All these different encodings add an extra eighth bit, doubling the possible number of characters and using the additional space for characters used by differing groups …

  • Latin 1 – Adds Western Europe and Americas (Afrikaans, Danish, Dutch, Finnish, French, German, Icelandic, Irish, Italian, Norwegian, Spanish and Swedish) characters.
  • Latin 2 – Adds Latin-written Slavic and Central European (Czech, Hungarian, Polish, Romanian, Croatian, Slovak, Slovene) characters.
  • Latin 3 – Adds Esperanto, Galician, Maltese, and Turkish characters.
  • Latin 4 – Adds Scandinavia/Baltic, Estonian, Latvian, and Lithuanian characters (is an incomplete predecessor of Latin 6).
  • Cyrillic – Adds Bulgarian, Byelorussian, Macedonian, Russian, Serbian and Ukrainian characters.
  • Arabic – Adds Non-accented Arabic characters.
  • Modern Greek – Adds Greek characters.
  • Hebrew – Adds Non-accented Hebrew characters.
  • Latin 5 – Same as Latin 1 except for Turkish instead of Icelandic characters
  • Latin 6 – Adds Lappish/Nordic/Eskimo languages. Adds the last Inuit (Greenlandic) and Sami (Lappish) letters that were missing in Latin 4 to cover the entire Nordic area characters.
  • etc.

All of this still doesn’t give global coverage though! There’s also an issue due to the inability of using different encodings on a single document, should you ever need to use characters from different character sets.

We need an alternative …

Unicode

Unicode seeks to unify all the characters into one set.

This simplifies communication, as everyone can use a shared character set and doesn’t need to convert between them.

Unicode allows for over a million characters!

One of the most popular ways to encode Unicode, is as UTF-8.  UTF-8 has a variable width. Depending on the character used to encode, either 8, 16, 24 or 32 bits are used.

For characters in the ASCII character set, only 8 bits need to be used.

Another way to encode Unicode is UTF-32, which always uses 32 bit. This fixed width is simpler, but causes it to often use significantly more space than UTF-8.

Emoji

You probably don’t need telling, but Emoji are picture characters.

For a long time, knowledge workers have created smiley faces and more complex emoticons using symbols.

To take this a step further, emoji provide a wealth of characters.

The data transferred is always the same, but the pictures used differ between different platforms. Depending on the device, you’re viewing this, our smiley face emoji, ?, will look different.

The popularity of emoji has actually helped push Unicode support, which includes emoji as part of its character set.

I’ve pulled out a few recently added ones and you can see more on the Unicode website.

U+1F996 added in 2017 – T-Rex ?
U+1F99C added in 2018 – Parrot ?
U+1F9A5 added in 2019 – Sloth ?


Feature image by Thomas licensed CC BY-SA 2.0.

WP-CLI – The Swiss Army Knife For WordPress

WP-CLI (WordPress Command-Line Interface) is an open source project providing a command-line interface for managing WordPress sites. It is an extremely powerful and versatile tool, being able to carry out pretty much any operation that would normally be carried out via the web control panel, along with some additional functions that are only available via the CLI.

We use WP-CLI extensively here at Dogsbody Technology. It allows us to streamline and automate our WordPress set up and maintenance routine, so we thought we’d spread the word and get everybody else in on the action.

Installation

There are a few installation methods for WP-CLI, all which are documented here. We typically use the Phar installation method, which is as simple as:

curl -O https://raw.githubusercontent.com/wp-cli/builds/gh-pages/phar/wp-cli.phar
chmod +x wp-cli.phar
sudo mv wp-cli.phar /usr/local/bin/wp

Basic Usage

Unless otherwise instructed, WP-CLI will operate on the site contained in your current working directory. So if you want to work on a particular site you’ll need to “cd” to the installation directory before running your command, or alternatively you can pass the --path argument to WP-CLI. e.g.

wp --path=/var/www/dogsbody.com plugin install yoast

Creating a new site

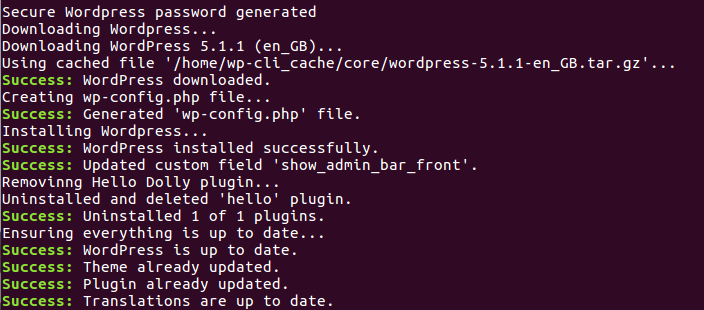
As well as managing existing sites, WP-CLI can also set up new ones. You’ll need to create a MySQL database and user, but beyond that WP-CLI can handle the rest. A basic site download/install procedure may look something like this:

wp core download --locale=en_GB
wp core config --dbname=database_name --dbuser=database_user --dbpass=database_password
wp core install --url=www.dogsbody.com --title="Dogsbody's Website" --admin_user=dogsbody --admin_password=admin_password --admin_email= --skip-email

Re-Writing a site

We often have customers wanting to take an existing site and re-configuring it to work on a new domain, or wanting to add HTTPS to an existing site and update everything to be served securely. WP-CLI makes this otherwise quite complex process much easier with with it’s search/replace feature:

wp search-replace 'https://www.dogsbodytechnology.com' 'https://www.dogsbody.com' --skip-columns=guid

(It’s advisable to skip the guid column as the guid of posts/pages within WordPress should never change).

In summary, WP-CLI is a very powerful tool and one that anybody working with WordPress sites often should at least be aware of. It can save you heaps of time and help you avoid mistakes.

If you want any help with WP-CLI, then please contact us. Or if you want some seriously fast and secure WordPress hosting, be sure to check out our WordPress hosting.

Happy World IPv6 Day 2019

Today IPv6 is 7 years old. While IPv6 was drafted in 1998 a global permanent deployment of IPv6 happened on 6 June 2012.

Unlike Google Play or the Raspberry Pi, which were launched in the same year, IPv6 adoption seems to be lagging behind with an increase of misinformation and organisations just ignoring the fact it even exists.

Currently IPv4 and IPv6 coexist in the Internet. Companies such as Sky completed there roll out of IPv6 way back in 2016 so if you still think the ‘internet doesn’t run on ipv6’ then you are very much mistaken.

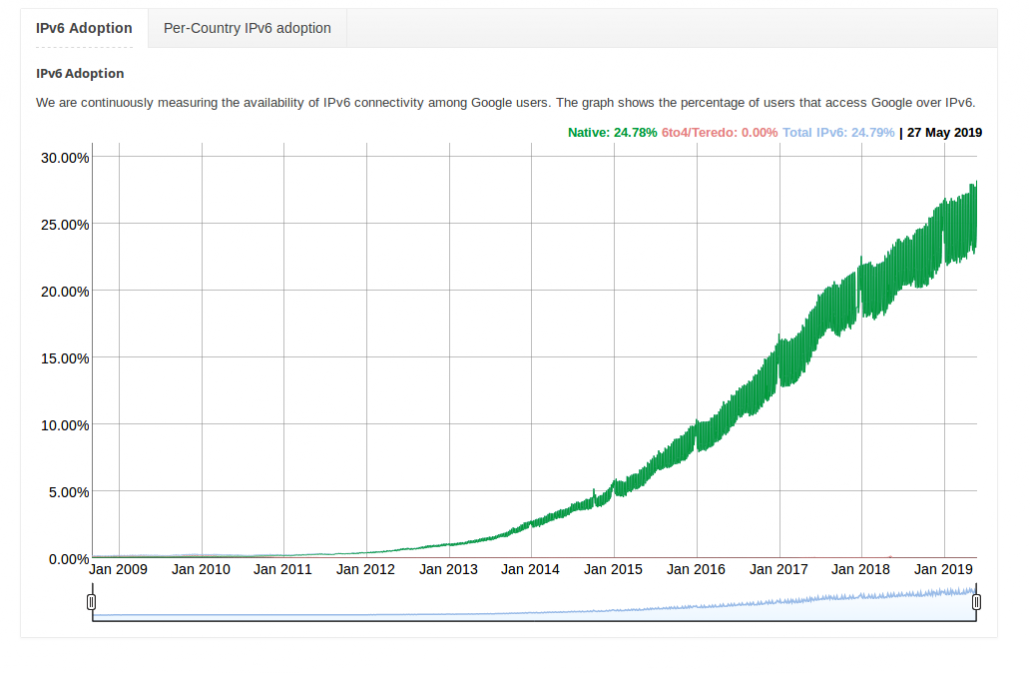
Google IPv6 adoption graph shows how increasing important having IPv6 is and will be to your business.IPv6 Adoption

What is IPv6?

IPv6 uses a 128-bit address, theoretically allowing 2128, or approximately 3.4×1038 addresses. The actual number is slightly smaller, as multiple ranges are reserved for special use or completely excluded from use. The total number of possible IPv6 addresses is more than 7.9×1028 times as many as IPv4, which uses 32-bit addresses and provides approximately 4.3 billion addresses.

Why do I need to worry about it?

IPv4 has fewer than 4.3 billion addresses available – which may seem a crazy amount but since the internet become more popular back in the 1980’s they knew the addresses would run out!  The addition of millions of mobile devices over the last few years have not helped this at all. Sure enough IPv4 is now in the final stages of exhausting its unallocated address space, and yet still carries most Internet traffic.

Are you and your Business ready for IPV6?

Do you have IPv6 on your server? Does your monitoring solution monitor both IPv4 and IPv6?

Dogsbody Technology Server monitoring and management has included monitoring of IPv6 from its launch 6 years ago but we are still amazed at how many companies don’t support IPv6.  We still have trouble finding suppliers that fully support it and there is now an ongoing race for people to make an operating system that is IPv6 only from the ground up.

Certainly.  We try to set all servers up with IPv6 as standard.

Further reading:

Feature image by Phil Benchoff licensed  CC by 2.0

Infographic: Losing the automatic right to .uk

If you own any third-level domains ending .uk then the matching second-level .uk domain may have been reserved for you until 25 June 2019.  For example, if you own example.co.uk your ability to register the shorter example.uk may have been reserved.

After 1 July 2019 any reserved .uk domains that have not been registered will be released into the public domain meaning they can be registered by anyone.

What should I do?

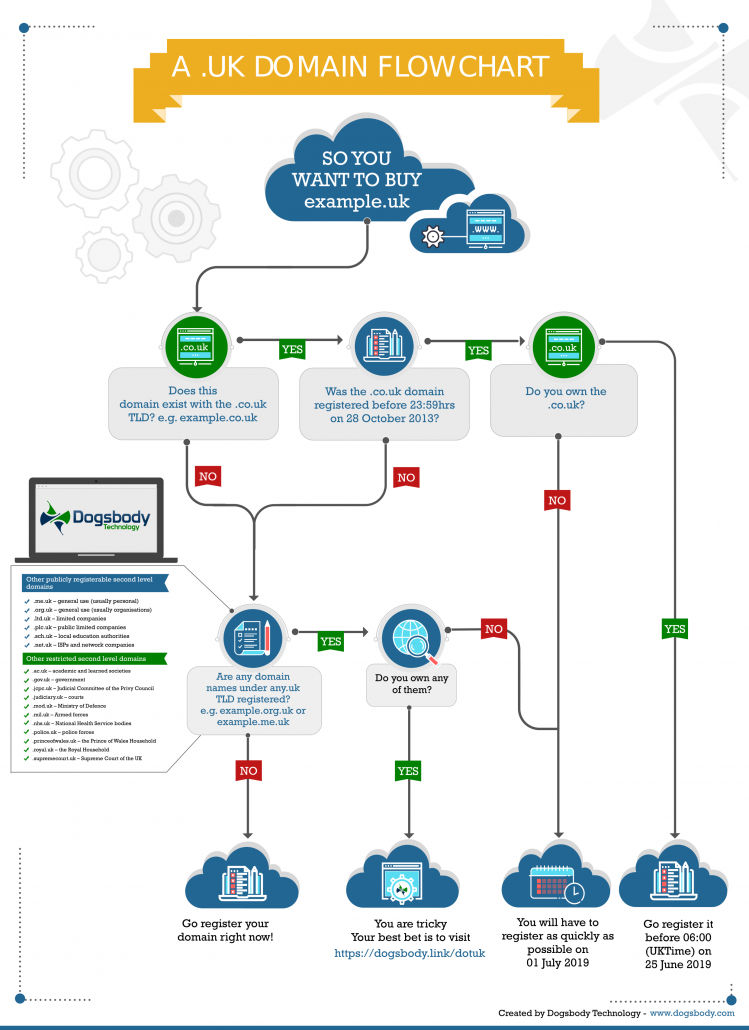
Assuming you want the shorter .uk version of a domain then there are a number of checks to go through.  You can check the rights to a domain on the Nominet website or we have made the following handy infographic to get you started…

Rights to a .uk domain

Why is this happening?

In June 2014 (5 years ago) Nominet, the controllers of the .uk Top Level Domain (TLD) decided to allow people to register second level domains.  That is, to allow people to register example.uk (second level domain names) instead of being forced to register example.co.uk, example.org.uk, example.ltd.uk etc. (third level domain names).

They wanted to make it fair for existing rights holders and domain owners to obtain one of the shorter .uk domains and so locked access to stop anyone registering any domains that already existed as third level domains for 5 years.

Five years later and that time is now up.  In July 2019 anyone will be able to register any second level .uk domain no matter whether the equivalent third level domain is registered or not.

I’m eligible – How do I register the .uk version of my domain?

Contact your current registrar who will be able to help you with this. Remember you need to register the .uk domain name yourself before 6am BST (UTC+1) on the 25th of June 2019.

There is a .uk domain I want but am not eligible  – what can I do?

Wait…. If the eligible party don’t purchase it then it becomes publicly available to be purchased by anyone from the 1st July 2019.
We plan on doing a follow up blog post nearer the time on “name dropping” services that can be used to grab the domains you want when they become available.

If any of this is too much for you then give us a shout, we are here to help.  Do remember though… a domain name is for life, not just for Christmas 😉

More detailed information on this subject can be found on nominet.uk.

Please feel free to share this infographic with anyone you feel may find this useful using the buttons below.

Dogsbody is proud to announce StatusPile

What is StatusPile?

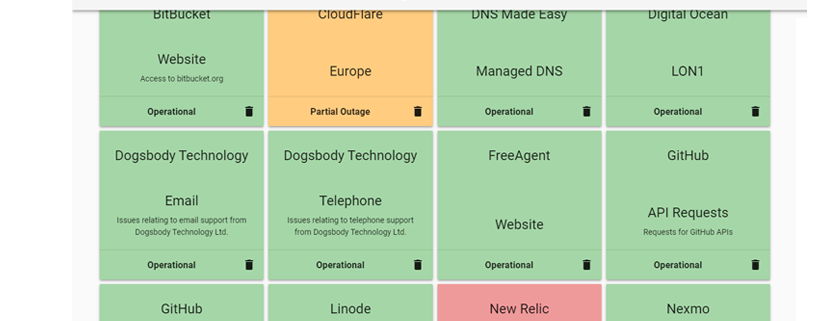
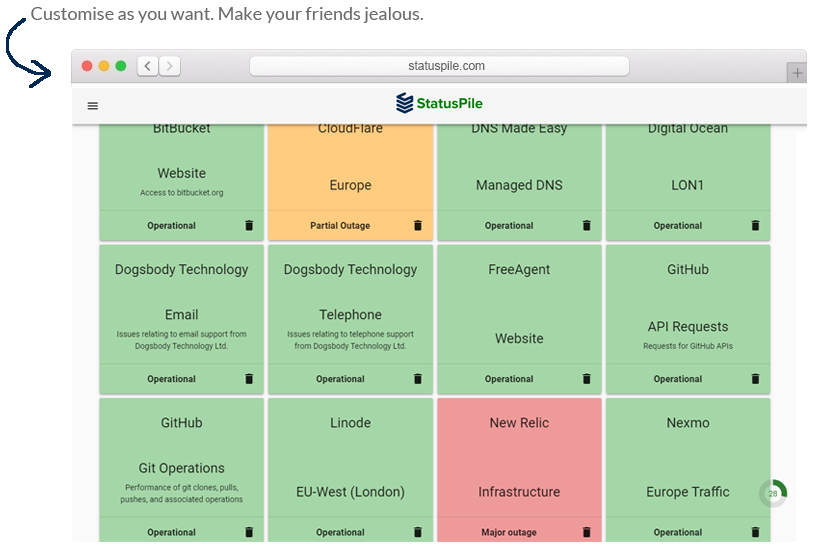
Simply put – it’s your status page of status pages.

Most service providers have some kind of status page. When something goes wrong, you have to visit all providers, to find out where the issue lies.

With StatusPile you need to visit just one place to see all statuses at-a-glance. 

Login via Auth0 to create your very own customised dashboard and then visit just one dashboard, to see which provider has issues.

Each tile also links directly to that provider’s status page, for when you need the detail.

Oh and did we mention, it’s completely free to use?

Why did we build StatusPile?

One of Dogsbody’s stated aims is to give back to the OpenSource community.

This project has certainly done that. StatusPile is already helping developers and DevOps people around the world. We are also actively encouraging contributions and additions to the service provider list.

The code is on Github.  Feel free to contribute, fork the code, submit a pull request or submit any suggestions of providers you would like to see added in the future.

We asked Dogsbody’s founder what’s behind the project.

“We needed a status dashboard for the services we monitor for our clients. We couldn’t find one, so we built one.
It’s simple to use, works with AuthO authentication and is available for forking. We hope you find it as useful as we do.”
– Dan Benton, founder of Dogsbody Technology

How do I get started?

1) Visit StatusPile.com.

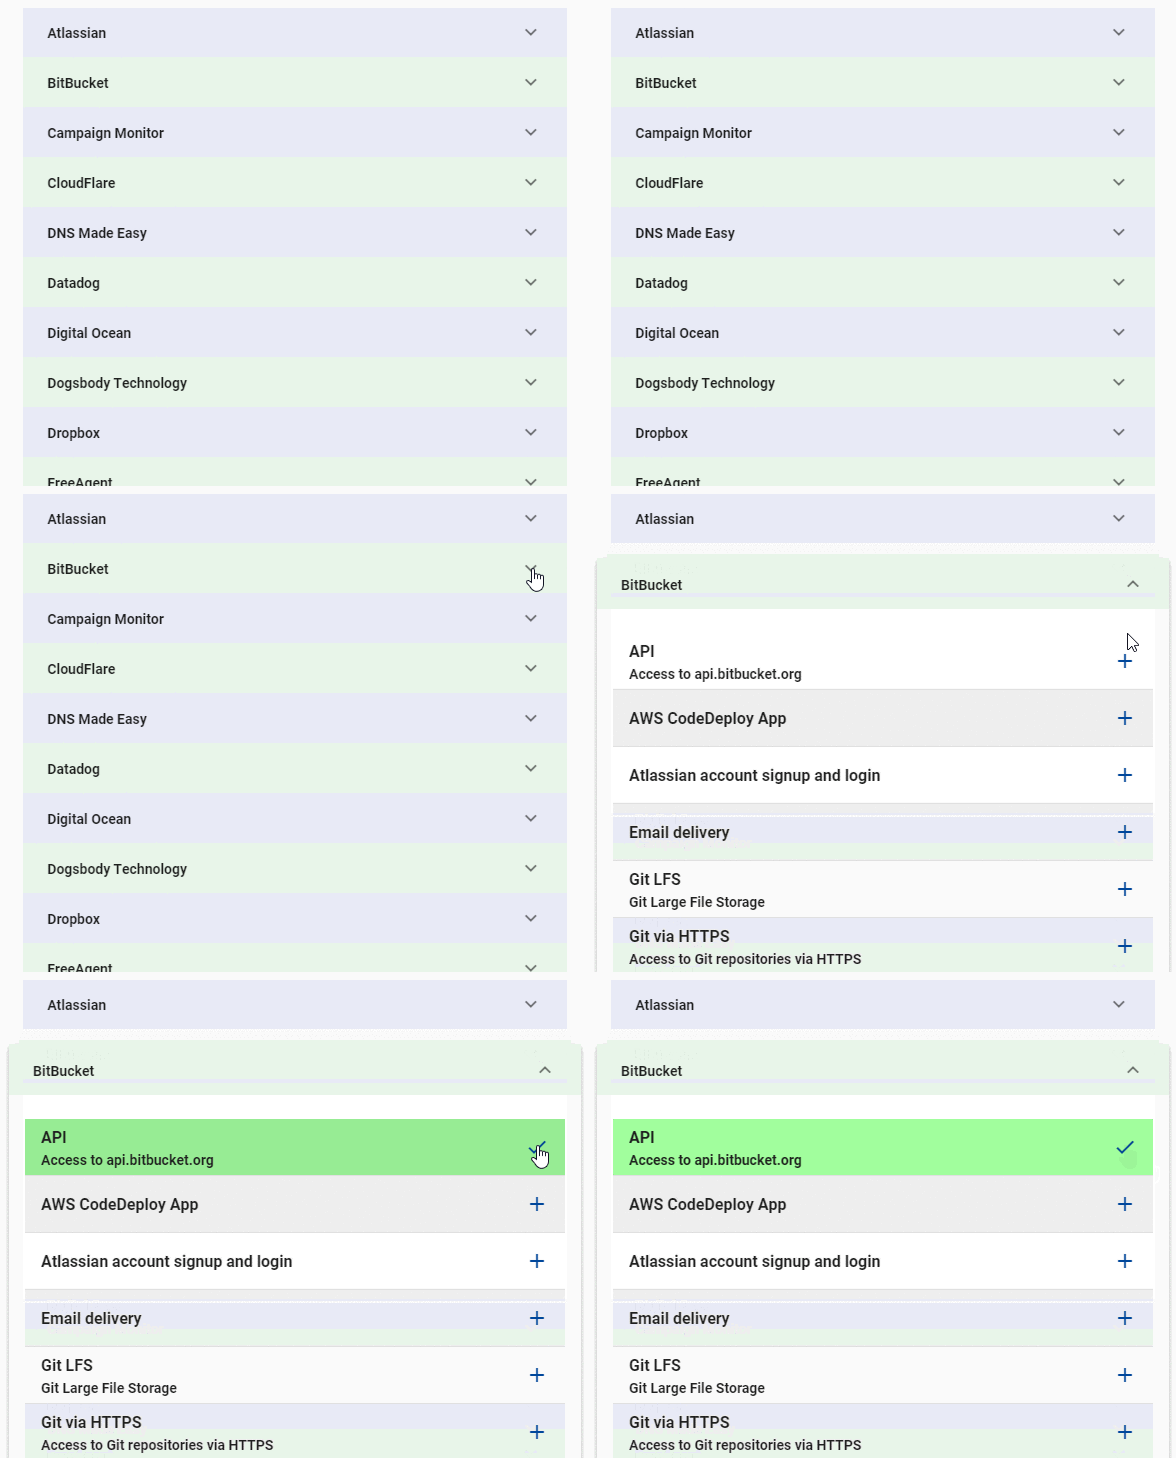
2) Customise your dashboard:

3) Login to save your configuration, using your favourite platform (or email):

(Hat tip to Auth0 for the free license).

We hope you find it as useful as we do. We plan to add more providers and features over the coming months – so why not check it out today?

Tripwire – How and Why

Open Source Tripwire is a powerful tool to have access to.  Tripwire is used by the MOD to monitor systems.  The tool is based on code contributed by Tripwire – a company that provide security products and solutions.  If you need to ensure the integrity of your filesystem Tripwire could be the perfect tool for you.

What is Tripwire

Open Source Tripwire is a popular host based intrusion detection system (IDS).  It is used to monitor filesystems and alert when changes occur.  This allows you to detect intrusions or unexpected changes and respond accordingly.  Tripwire has great flexibility over which files and directories you choose to monitor which you specify in a policy file.

How does it work

Tripwire keeps a database of file and directory meta data.  Tripwire can then be ran regularly to report on any changes.

If you install Tripwire from Ubuntu’s repo as per the instructions below a daily cron will be set-up to send you an email report.  The general view with alerting is that no news is good news.  Due to the nature of Tripwire it’s useful to receive the daily email, that way you’ll notice if Tripwire gets disabled.

Before we start

Before setting up Tripwire please check the following:

  • You’ve configured email on your server.  If not you’ll need to do that first, we’ve got a guide.
  • You’re manually patching your server.  Make sure you don’t have unattended upgrades running (see the manual updates section) as unless you’re co-ordinating Tripwire with your patching process it will be hard for you to distinguish between expected and unexpected changes.
  • You’re prepared to put some extra time into maintaining this system for the benefit of knowing when your files change.

Installation on Ubuntu

sudo apt-get update
sudo apt-get install tripwire

You’ll be prompted to create your site and local keys, make sure you record them in your password manager.

In your preferred editor open /etc/tripwire/twpol.txt

The changes you make here are based on what you’re looking to monitor, the default config has good coverage of system files but is unlikely to be monitoring your website files if that’s something you wanted to do.  For example, I’ve needed to remove /proc and some of the files in /root that haven’t existed on systems I’ve been monitoring.

Then create the signed policy file and then the database:

sudo twadmin --create-polfile /etc/tripwire/twpol.txt
sudo tripwire --init

At this point it’s worth running a check. You’ll want to make sure it has no errors.

sudo tripwire --check

Finally I’d manually run the daily cron to check the email comes through to you.

sudo /etc/cron.daily/tripwire

Day to day usage

Changing files

After you make changes to your system you’ll need to run a report to check what tripwire sees have changed.

sudo tripwire --check

You can then update the signed database.  This will open up the report allowing you to check you’re happy with the changes before exiting.

sudo tripwire --update -r /var/lib/tripwire/report/$HOSTNAME-yyyyMMdd-HHmmss.twr

You’ll need your local key in order to update the database.

Changing policy

If you decide you’d like to monitor or exclude some more files you can update /etc/tripwire/twpol.txt.  If you’re monitoring this file you’ll need to update the database as per the above section.  After that you can update the signed policy file (you’ll need your site and local keys for this).

sudo tripwire --update-policy /etc/tripwire/twpol.txt


As you can see tripwire can be an amazingly powerful tool in any security arsenal.  We use it as part of our maintenance plans and encourage others to do the same.


Feature image by Nathalie licensed CC BY 2.0.

The Cloud Native Computing Foundation

The Cloud Native Computing Foundation (CNCF) is:

an open source software foundation dedicated to making cloud native computing universal and sustainable

They do this by hosting and “incubating” projects they see as valuable, helping them to develop and reach maturity, where they can be used widely in cloud environments.

CNCF has over 350 members including the world’s largest public cloud and enterprise software companies as well as dozens of innovative startups

The CNCF is also backed by the Linux Foundation, who are fast becoming one of the most recognised organisations in the industry. They support the open source community as a whole, aiming to protect and accelerate development of the Linux kernel, along with many other things.

Why should I care?

The CNCF is exciting as, for me at least, it provides a bit of a portal into the way that the industry is moving at the moment.  It showcases both the current behemoths of cloud computing software stacks, along with projects that are likely to replace or supplement them in the future. The CNCF split their projects into 3 main categories:

  • Graduated
  • Incubating
  • Sandbox

Graduated projects are ones that have reached maturity and see wide adoption. The current list of these projects at the time of writing are Kubernetes, Prometheus, Envoy, CoreDNS and containerd. If you’ve been even dabbling in the cloud/linux community, then you’ve probably heard of at least a few of these projects.

Incubating projects are ones that haven’t quite hit the prime time yet, but are well on their way. These currently include projects such as rkt, a container engine that’s a potential competitor for Docker, CNI (Container Network Interface), which focuses on configuring networking within containers, and etcd, a key-value store designed for storing critical system data.

I find the CNCF useful for guiding me on what pieces of software I should be learning to enhance my skill set as they’re likely to be desirable in the short to medium term. It’s also one of the first places I’m likely to check for a piece of software that fits a particular need, as I know that CNCF projects are going to be active, well supported, and have lots of related stack overflow questions / Github issues for when I’m getting started.

Training and Certification

The CNCF also offer some training and certification options. This is useful to prove that you’re familiar and capable with some of the technologies they support. At the time of writing, the training courses and certifications they offer are all kubernetes based (which is by no means a bad thing), but I’m sure they will offer more in the future.

In summary, the CNCF acts a sort of central hub for a lot of the hottest and biggest projects right now, and even if you’re don’t have a particular need for them at this time, it’s good to know what’s out there right now, as well as coming over the hill, and it’s therefore useful for this reason alone.


Featured image by chuttersnap on Unsplash