Tag Archive for: AWS

AWS Logo

Amazon Linux 1 goes EOL 30 June 2023

Updated 13 January 2023

Amazon Linux 1 (Amazon Linux AMI) extended maintenance support period ends on June 30, 2023. After this date Amazon Linux 1 will no longer be supported.

Following customer feedback back in 2020, Amazon extended the end-of-life date of its Amazon Linux 1 and announced a maintenance support period – This Period is coming to an end.

This post has been updated with the latest information

On the 30th June 2023, Amazon Linux 1 goes End of Life (EOL). Amazon has also released Amazon Linux 2022. You have the option to upgrade to Amazon Linux 2 or Amazon Linux 2022.

Technology and security evolves. New bugs are fixed and new threats prevented, so in order to maintain a secure infrastructure it is important to keep all software and systems up to date. Once an operating system reaches end of life, it no longer receives updates, so will end up left with known security holes. Old operating systems don’t support the latest technologies, which new releases of software depend on, this can lead to compatibility issues.

Leaving old Amazon Linux 1 systems past June 2023 leaves you at risk to:

  • Security vulnerabilities of the system in question
  • Making your network more vulnerable as a whole
  • Software incompatibility
  • Compliance issues (PCI)
  • Poor performance and reliability

Amazon Linux 2022 includes many of the same packages that were present in Amazon Linux 2. Some of these package versions were updated for Amazon Linux 2022.

Changes:
MariaDB -> 10.5.16
Python -> 3.9

You can upgrade to either version of Amazon Linux – points to note are

Amazon Linux 2

  • 3 years of support – End of Life: 30 Jun 2025.
  • CentOS based

Amazon Linux 2022

  • Fedora Based.
  • 5 years of support
  • Uses DNF instead of YUM for updates

Not sure where to start? Contact us to help with your migration.

Duplicacy: Backup to the cloud

Duplicacy is an open source backup tool which supports a large number of storage back-ends, including many cloud offerings, whilst also providing many other useful features. We recently implemented a duplicacy-based backup solution for a customer, and wanted to share our experience to help out anybody looking to implement duplicacy themselves.

Installation

Duplicacy is written in Go, meaning it can be easily downloaded and compiled on the CLI. However, this involves installing Go on the system you wish to backup, which may not always be an option. Fortunately, duplicacy also provides binary releases, which can be downloaded and executed with ease.

To install duplicacy on a Linux system, the steps are as follows:

wget https://github.com/gilbertchen/duplicacy/releases/download/v2.1.0/duplicacy_linux_x64_2.1.0
sudo mv duplicacy_linux_x64_2.1.0 /usr/local/bin/duplicacy
sudo chmod +x /usr/local/bin/duplicacy

You can then run duplicacy by simple running the “duplicacy” command in your terminal.

Setting up your storage

As mentioned above, duplicacy supports an impressive number of storage back-ends. As of the time of writing, they are:

  • Local disk
  • SFTP
  • Dropbox
  • Amazon S3
  • Wasabi
  • DigitalOcean Spaces
  • Google Cloud Storage
  • Microsoft Azure
  • Backblaze B2
  • Google Drive
  • Microsoft OneDrive
  • Hubic
  • OpenStack Swift
  • WebDAV (under beta testing)
  • pcloud (via WebDAV)
  • Box.com (via WebDAV)

The two options that we’ve used are SFTP and AWS (Amazon Web Services) S3. To backup a system over SFTP, all you need is a working SFTP user on the remote system. No additional set up is required.

The set up for Amazon S3 is a little more involved, in summary, the steps are:

  • Create an Amazon S3 bucket in your preferred region
  • Create an IAM policy granting permissions on this bucket
  • Create an IAM user and assign them this policy
  • Configure duplicacy to use this user and bucket

Creating an S3 bucket

Creating a bucket is pretty straightforward. Login to your Amazon S3 account, go to the S3 service, click “Create bucket”, give your bucket a name, select a region, done. There are some other options when creating a bucket but these are not relevant to this post so I’ll not cover them here.

Creating an IAM policy

IAM stands for Identity and Access Management, and is central to many operations in AWS. To create your policy, navigate to the IAM service in AWS, select “policies” on the left, and click the big blue “Create policy” button at the top.

On this screen, choose the “JSON” tab. This is where we’ll specify the guts of our policy. It should look something like this:

{
    "Version": "2012-10-17",
    "Statement": [
        {
            "Effect": "Allow",
            "Action": "s3:ListAllMyBuckets",
            "Resource": "arn:aws:s3:::*"
        },
        {
            "Effect": "Allow",
            "Action": "s3:*",
            "Resource": [
                "arn:aws:s3:::dbt-gary-duplicacy-backup-example",
                "arn:aws:s3:::dbt-gary-duplicacy-backup-example/*"
            ]
        }
    ]
}

You’ll need to replace “dbt-gary-duplicacy-backup-example” with the name of the S3 bucket you created in the last step

When you’re happy with your policy, click “Review policy”, followed by “Save changes”

Creating an IAM user and assigning the policy

From the home of the IAM service, now click “Users” on the left, followed by the big blue “Add user” button at the top. Provide a name for your user, and check the “Programmatic access” box below. Click next.

On the next screen, click “Attach existing policies directly”. At the top of the list of policies now listed below, click the “Filter: Policy type” drop-down, and select “Customer managed”. Check the box for your IAM policy, and click “review” to continue, followed by “Create user” on the next page.

Your IAM user and policy have now been created.

Ensure that you save the details now presented to you. You will need these to configure duplicacy

Configuring duplicacy

On the system you wish to backup, navigate to the directory you wish to backup. For example, on the system we configured, this was the “/home” directory. You can now configure duplicacy. The steps are as follows:

sudo duplicacy init your_repo_name s3://your-region@amazon.com/your_bucket_name
sudo duplicacy set -key s3_id -value your_access_key
sudo duplicacy set -key s3_secret -value your_secret_key

There are a number of strings you’ll need to replace in the above snippet:

your_repo_name – The name you’d like to give to this set of backups. For example, “johns-desktop”

your_bucket_name – The name you gave your S3 bucket in the steps above.

your_region – This is the AWS region you select for your buck above. Please see this table, using the “region” column that corresponds to your region name. For example, “eu-west-2” for the London region

your_access_key – This is the access key for the IAM user you created above. It will be a long string of random looking characters.

your_secret_key – This is the secret key for the IAM user you created above. It will again be a long string of random looking characters. Make sure you keep this safe, as anybody who has it can access your backups!

Running a backup

If all went well with the above, then you’re ready to run your first backup. This is as easy as running:

sudo duplicacy backup

This will backup all files under the current directory. Depending on the number of and size of files, this may take some time.

Including/excluding certain files/directories from your backups

Duplicacy offers powerful filtering functionality allowing for fine grained control over what files and directories you want to backup. These can be somewhat confusing to configure, but are very useful once you’ve got the hang of them. We may do a follow up post covering these, so be sure to check back in the future.

Restoring backups from duplicacy

In order to restore from duplicacy, you need to configure your system to interact with your backups. If you’re restoring on the same system the backups were taken on, you need not take any additional steps. If you’re restoring to a different system, you need to follow the installation and duplicacy configuration steps show above.

Once things are configured, you can view the available backups like so:

sudo duplicacy list

Note that you must be in the correct directory on your system (the one where you initialised your repo), in order to view the backups

This will give you a list of your backups:

Snapshot johns-desktop revision 1 created at 2018-04-12 07:29 -hash
Snapshot johns-desktop revision 2 created at 2018-04-12 12:03 
Snapshot johns-desktop revision 3 created at 2018-04-17 17:37 
Snapshot johns-desktop revision 4 created at 2018-04-18 11:10 
Snapshot johns-desktop revision 5 created at 2018-04-18 14:38 
Snapshot johns-desktop revision 6 created at 2018-04-20 03:02 
Snapshot johns-desktop revision 7 created at 2018-04-21 03:02 
Snapshot johns-desktop revision 8 created at 2018-04-22 03:02 
Snapshot johns-desktop revision 9 created at 2018-04-23 03:02

As you can see, there are revision numbers and the corresponding times and dates for these revisions. Revisions are just another name for a backup.

You can then restore a particular backup. For example, to restore revision 7:

sudo duplicacy restore -r 7

Again, depending on the number and size of files in this backup, this may take some time.

Duplicacy offer some really cool features when using the restore command. For example, you can see the contents of a file in a backup with the “cat” option, and compare differences between two backups with the “diff” option. You can see all of the options here.

Selective restores

One of the more useful restore options is to only restore a certain file or directory from your backup. This can be accomplished with the following command:

sudo duplicacy restore -r 7 path/to/your/file.txt

This can also be extended to restore everything under a directory, like so:

sudo duplicacy restore -r 7 path/to/your/directory\*

Summary

Duplicacy is an extremely powerful and portable backup tool, allowing for reliable and fine grained backups of your data. If you have any questions on duplicacy or would like any help setting it up, please leave a comment below or contact us and we’ll be happy to help. Thanks for reading.

Feature image background by 111692634@N04/ licensed CC BY-SA 2.0.

Setting up IPv6 on your EC2

This is the second part of a two part series on setting up IPv6 in Amazon Web Services (AWS).  The first part discussed setting up IPv6 in your AWS VPC.  This second part will discuss setting up IPv6 on your EC2 instances.

Why there are no new IPv4 jokes? Because it is exhausted!

Seeing as most of you have come from our other blog post we’ll jump straight in…

Step 1: Security Groups

Do one thing and do it well, a great philosophy we follow at Dogsbody Technology. AWS follow it strongly as well splitting their server hosting into many individual services. Security Groups are their firewall service, and since they are based on IP addresses they need updating for IPv6.

  1. Open the EC2 management console, you can also find this by selecting the services menu at the top left and searching for “EC2”.
  2. In the navigation bar, under the “Network & Security” tab, Select Security Groups.
  3. Select a Security Group in your VPC
  4. Select the “Inbound” tab and “Edit” the rules
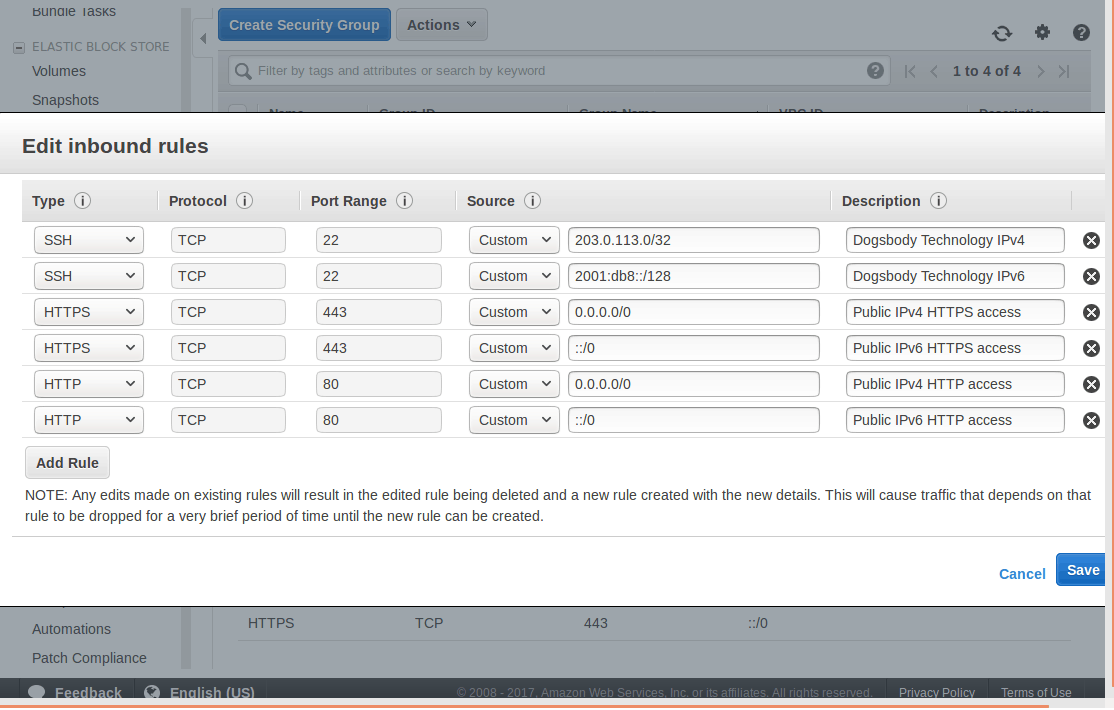
    • There should be an IPv6 record mirroring your current IPv4 ones.
    • Remember ::/0 is the IPv6 equivalent of 0.0.0.0/0.Adding new IPv6 rules to the security group
  5. Now inbound IPv6 traffic is allowed into the server we need to allow traffic out.
  6. Select the “Outbound” tab and “Edit” the rules
    • Create new IPv6 outbound rules just as you have IPv4.
    • With most of our servers we have no reason to block outbound traffic, we can trust our server, so this is as simple as follows:
      • Type, All traffic; Protocol, All; Port Range, 0 – 65535; Destination, ::/0; Description, Allow all IPv6 Traffic out.

Step 2: Assign the IP address

The final step in AWS is to assign your new IP address. This will be your new name in the IPv6 world.

  1. Under the navigation bar select “Instances”
  2. Select your instance
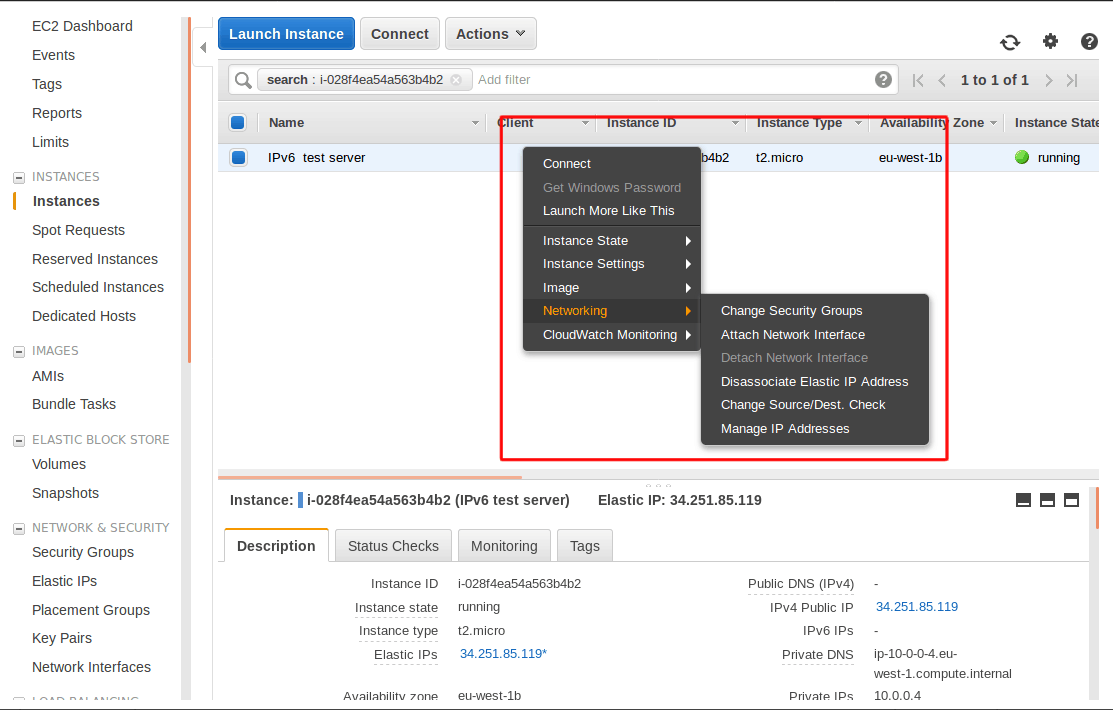
    1. Right click and go to the “Networking” tab and select “Manage IP Addresses”
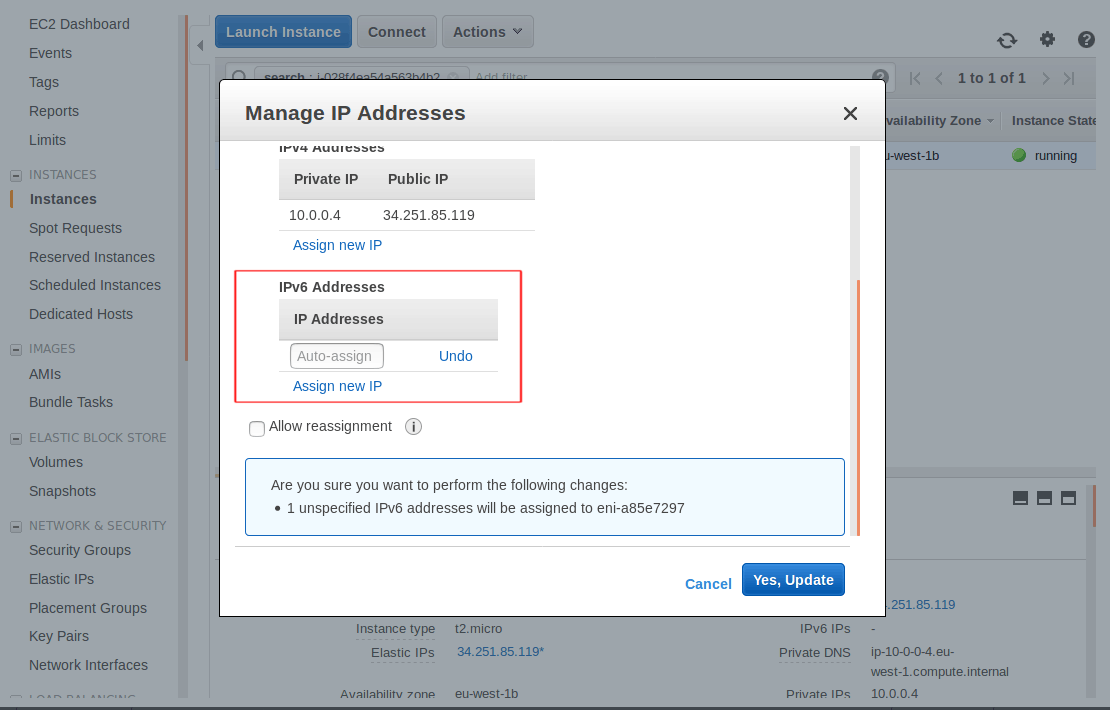
    2. Assign a new IPv6 address

Opening the manage IP addresses menu for my instance

Assigning a new IPv6 IP

Step 3: Listen in the Operating System

Each Operating System has a slightly different network set up and will need a different configuration.

If you are unsure what Operating System you are running you can find out by reading this file:

cat /etc/*-release

I use vim below but you can use nano if you prefer we don’t mind. 🙂

Ubuntu 16 clients

  1. Connect into the server on the command line over IPv4 as the admin user.
  2. Find your Network Interface name
    • You can see all running network interfaces by running ifconfig, in most situations there should be two interfaces. lo is for local networking (where the traffic doesn’t leave the server) and there will be another which is what you are looking for.
    • You can also see your interfaces via the current configs: cat /etc/network/interfaces.d/50-cloud-init.cfg
    • My interface is eth0 but it will depend on your instance type what interface name you have.
  3. Create a new configuration file for IPv6.
    • sudo vim /etc/network/interfaces.d/60-auto-ipv6.cfg
    • And add the following line to your file and save.
      • iface eth0 inet6 dhcp
    • If you are interested in what this line does, it binds to the interface (for me eth0) using the inet6 (IPv6) address family and uses DHCP (Dynamic Host Configuration Protocol) to get the servers IP address.
  4. And last of all to load in this new config
    • sudo service networking restart
    • OR sudo ifdown eth0 && sudo ifup eth0 replacing “eth0” with your interface name.

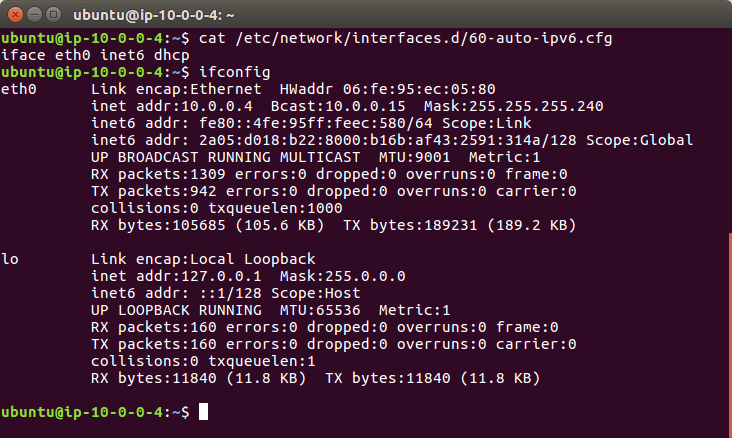
A configured Ubuntu 16 server

Ubuntu 14 clients

You will need to reboot your Ubuntu 14 system to load in the new static IPv6 address.

  1. Connect into the server on the command line over IPv4 as the admin user.
  2. Find out your Network Interface name
    • You can see all running network interfaces by running ifconfig
    • My interface is eth0 but it will depend on your instance type what you have.
  3. Edit the existing network interface file.
    • vim /etc/network/interface.d/eth0.cfg
    • And make sure it contains the below lines
    auto lo
    iface lo inet loopback
    
    auto eth0
    iface eth0 inet dhcp
            up dhclient -6 $IFACE
    • If you are interested in what these lines do, lines 1 and 2 set up a local loopback interface this guides traffic from the server to itself which sounds strange but is used often in networking.
    • Lines 3 and 4 starts networking on eth0 using DHCP (Dynamic Host Configuration Protocol) to get the servers IP address
    • Finally line 6 starts dhclient which handles DHCP with the -6 flag to get the IPv6 address.
  4. Reboot the server. sudo reboot

RedHat Enterprise Linux 7.4 and CentOS 7.4 clients

  1. Connect into the server on the command line over IPv4 as the admin user.
  2. On version 7.4 networking is managed by cloud-init. This is a standard tool for configuring cloud servers (like EC2 instances).
  3. Create a new config file in which we will enable ipv6 and add the below options.
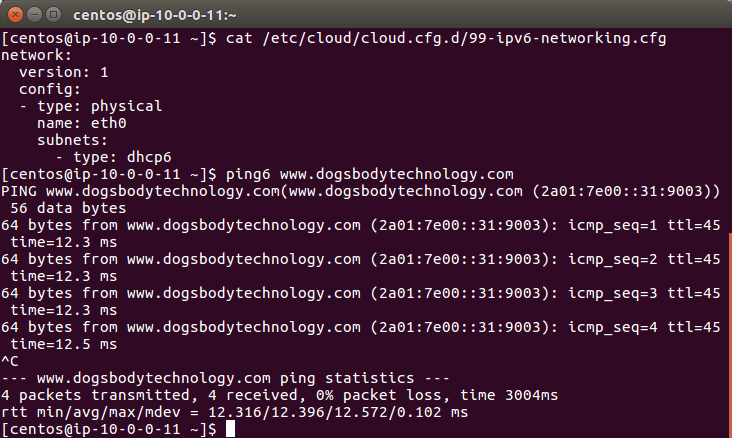
  4. vim /etc/cloud/cloud.cfg.d/99-ipv6-networking.cfg
network:
        version: 1
        config:
        - type: physical
                name: eth0
                subnets:
                - type: dhcp6

A configured CentOS 7.4 server

RedHat Enterprise Linux 7.3 and CentOS 7.3 clients

  1. Connect into the server on the command line over IPv4 as the admin user.
  2. Edit the global network settings file
  3. vim /etc/sysconfig/network
    • Update the following line to match this. This will enable IPv6 for your system.
    • NETWORKING_IPV6=yes
  4. Edit the existing network interface file.
  5. vim /etc/sysconfig/network-scripts/ifcfg-eth0
    • Enable IPv6 for the interface
    • IPV6INIT=yes
    • Enable IPv6 DHCP so the server can automatically get its new IPv6 address
    • DHCPV6C=yes
    • Disable the Network Manager daemon so it doesn’t clash with AWS network services
    • NM_CONTROLLED=no
  6. sudo service network restart

Step 4: Run like you have never run before

You are set up, the complex bit is done. Now we are at the application layer.

  1. Test that your IP address is set up by running: ifconfig
    • You could see a line that starts “inet6 addr” and ends with “Scope: Global” this is your IPv6 address (which you can confirm by looking at the instance in the EC2 control panel).
  2. Test outbound connections work over IPv6: ping6 www.dogsbodytechnology.com
  3. We always use a server side firewall (along side the security groups) for the fine grain control it gives us on the server. It is essential that this firewall is updated to allow IPv6 connections.
    • A very common tool for maintaining firewall rules is iptables. This has an IPv6 equivalent ip6tables.
  4. Configure your web/app server software to listen to IPv6
    •  Below are some example configuration lines so these common applications will start listening on IPv6.
    • Apache
      • Listen to IPv6 traffic on port 80 from the IP “2001:db8::” Listen [2001:db8::]:80
    • NGINX
      • To start listening to all incoming IPv6 traffic on port 80 listen [::]:80;
      • In fact there is a flag that disables IPv4 connections  ipv6only=on
  5. To start using your domain name (example.com) you need to create “AAAA” records with your DNS provider. This DNS record type is specifically for IPv6 traffic so that they can find your server.

Conclusion

Well done for getting this far, I am glad we have both done our bit to bring IPv6 into this world.

If you have any questions please put them in the comments or contact us and we will be happy to get back to you  🙂

Feature image background by Eightonesix licensed Freepik.com & IPv6 Icon licensed CC BY 3.0.

Setting up IPv6 in your AWS VPC

This is the first part of a two part series on setting up IPv6 in Amazon Web Services (AWS).  This first part discusses setting up IPv6 in your AWS VPC.  The second part will discuss setting up IPv6 on your EC2 instances.

The IPv6 revolution is happening and you need to be a part of it, or you will be left behind running IPv4. Almost all major broadband service providers like BT and Sky provide IPv6 addresses by default. IPv6 and IPv4 are not compatible, and eventually IPv4 will be dropped altogether. Until that day dual stack set ups offer you the best of both worlds, readying you for the future.

Since last Christmas AWS have slowly been adding IPv6 support to more of their services and regions. However you need to actively opt in and set it up. These are my 6 steps to setting up IPv6 on AWS:

What is IPv6?

Internet Protocol version 6 (IPv6) is the most recent version of the Internet Protocol (IP), the communications protocol that provides an identification and location system for computers on networks and routes traffic across the Internet. IPv6 was developed […] to deal with the long-anticipated problem of IPv4 address exhaustion.

Wikipedia article on IPv6

Step 1: Pre-requisites

This guide assumes you have an existing AWS VPC set up and that you have full console access to your account.

Before you add IPv6 to your services it is worth making sure you can use it. Some older EC2 instances don’t yet support it. Check the docs for the table showing the EC2 generation and their IPv6 support status. You will need to re-size your EC2 instances to a supported instance type before you can fully set up IPv6.

Another catch is that some services including RDS do not support IPv6 yet, but do not fret as we are setting up a dual stack environment (supporting IPv4 and IPv6) and these services will continue working without issue over IPv4.

Step 2: Request an IPv6 range

Firstly we need to get an IPv6 range for your VPC. AWS give you a range of 4,722,366,482,869,645,213,696 different IPv6 IPs, to put this into perspective there are 4,294,967,296 total IPv4 IPs in the world!  :-O

  1. Back to the tutorial. Open the VPC management console, you can also find this by selecting the services menu at the top left and searching for “VPC”.
  2. In the navigation bar, on the left, select “Your VPCs”.
  3. Select the VPC you want to add IPv6 to.
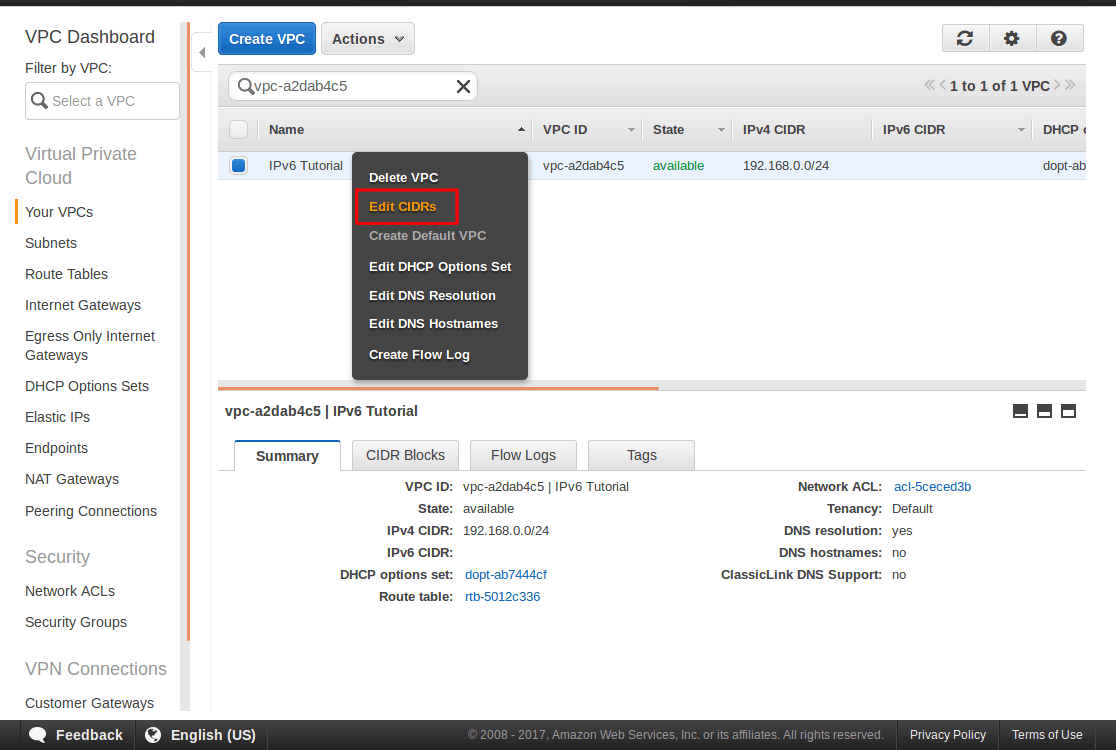
  4. Right click on the VPC and select “Edit CIDRs”.Step 4 selecting "Edit CIDRS"
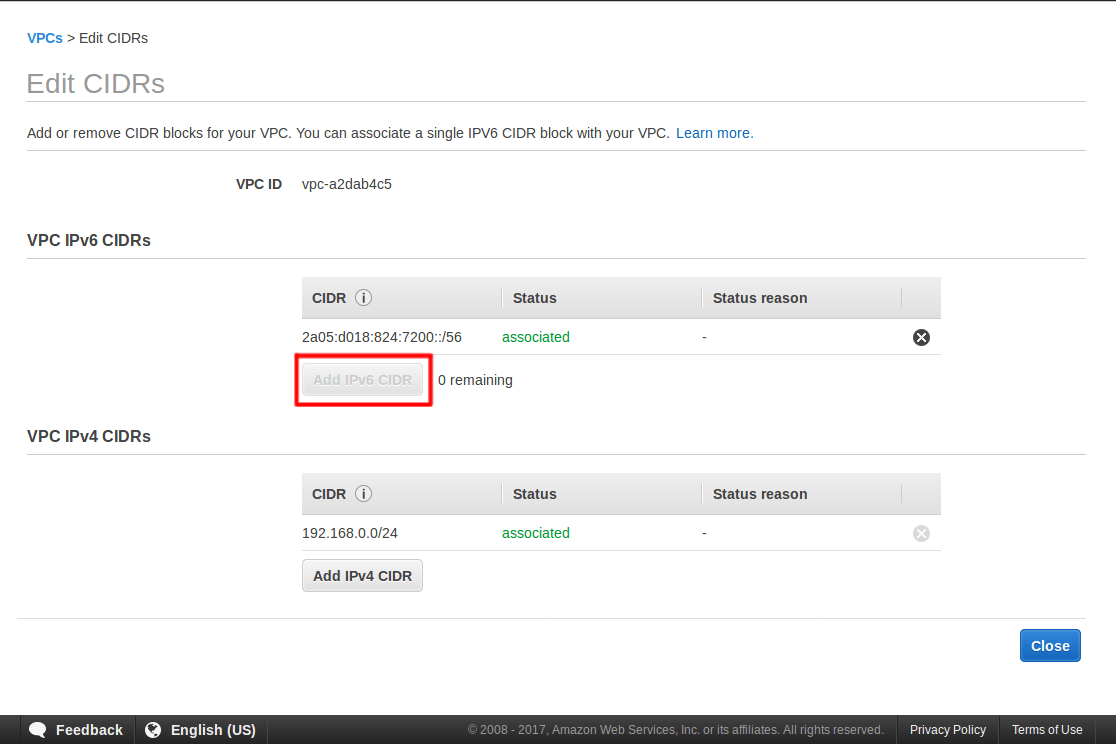
  5. Select Add IPv6 CIDR, it will then obtain a new IPv6 range for you and add it to your VPC.
  6. Select “Close” to continue.

Step 5 Adding a IPv6 CIDR

Step 3: Add IPv6 to your subnets

A subnet is a range of IP addresses. It makes routing traffic much simpler by pointing this range of IP’s in one direction rather than needing rules for each individual IP address. For example the IP address 203.0.113.76 is part of the 203.0.113.0/24 subnet range and routers on the internet will point all addresses in that range towards the owner of that range (Amazon for example). The /24 section indicates the size of the subnet, in this case it includes all IPs from 203.0.113.1 to 203.0.113.255.

This step adds the new IPv6 range to the subnets which your servers reside in.

  1. In the navigation bar, select “Subnets”, this takes you to a page which lists all subnets in all of your VPCs. If you have multiple VPCs you will want to filter the subnet page by VPC, making it easier to see which subnets you need to add IPv6 to. (You can filter by VPC on every menu we will be looking at in this tutorial.)
  2. Select a subnet in your VPC
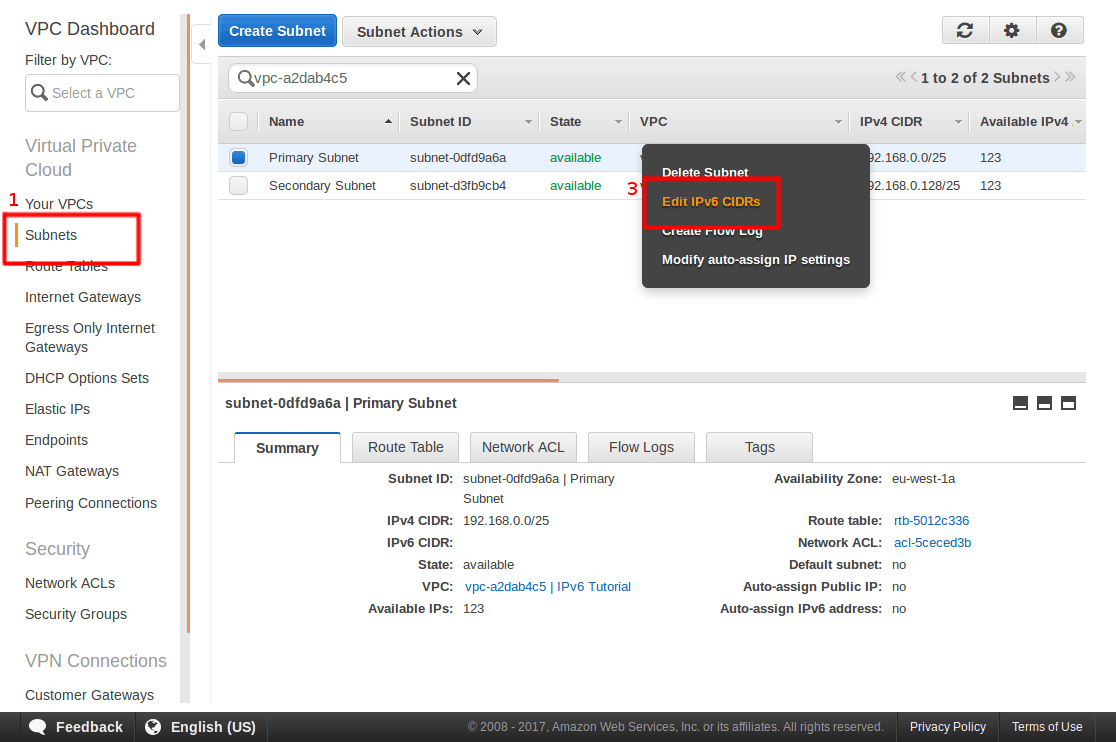
  3. Right click on it and select “Edit IPv6 CIDRs”Steps 1 and 3, configuring the subnet.
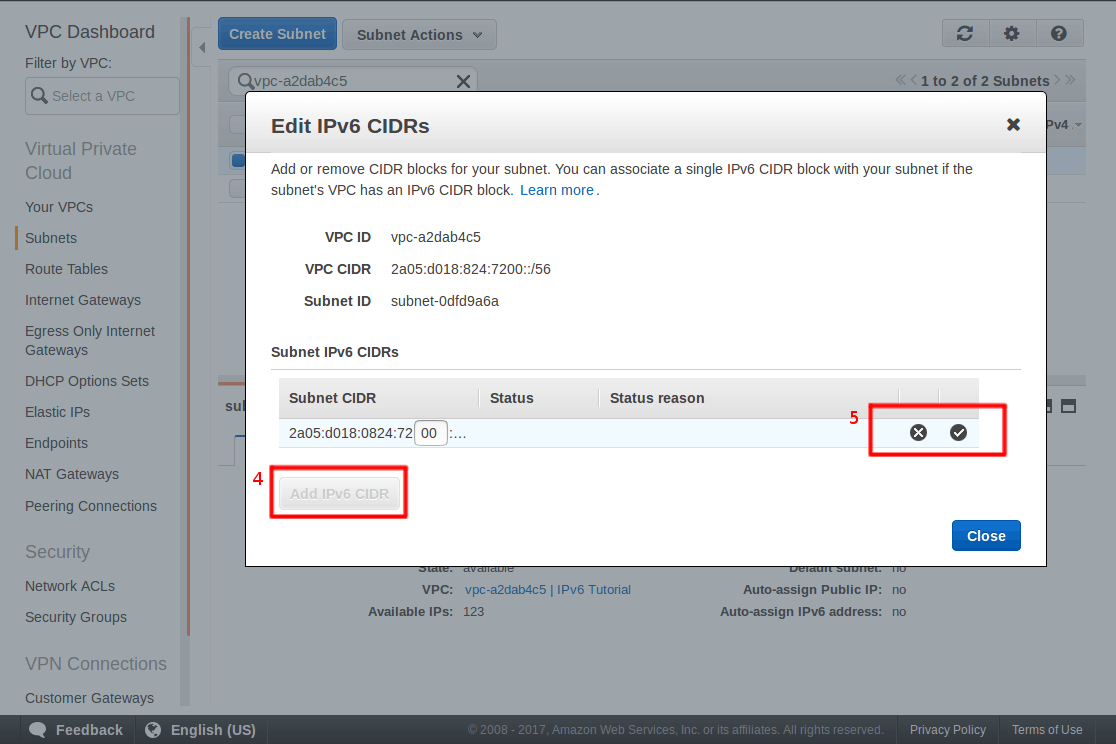
  4. Select “Add IPv6 CIDR”
  5. Press the tick icon that appears to the right of your new IPv6 range, this will associate it with the subnet.
  6. Close the menu.Steps 4 and 5, adding the new IPv6 range.
  7. Repeat items 2 to 6 for each subnet in your VPC

Step 4: Speaking to the internet

At this point we have set up our VPC with IPv6 traffic coming in. This section is about talking out to the internet and that starts with routing. The first part of routing is an Internet Gateway, this is an AWS service which provides network address translation. Simply it is a device which guides network traffic in the right direction on its way into the internet.

You may already have an Internet Gateway, if you do great you can skip to step 5.

  1. In the navigation bar, select “Internet Gateways”.
  2. Click “Create Internet Gateway” at the top.
  3. Give it a sensible name and press “Yes, Create” to save.

If you didn’t have an Internet Gateway before now, your servers would have only been able to speak to each other so be aware your servers can now talk to anyone on the Internet.

Step 5: Speaking to the IPv6 internet

The route table is telling all servers in your VPC this is the first hop on your journey, it passes internal traffic to your other servers, RDS instances, Elasticache instances etc and importantly it passes external traffic out to the Internet Gateway. That is what we are about to set up.

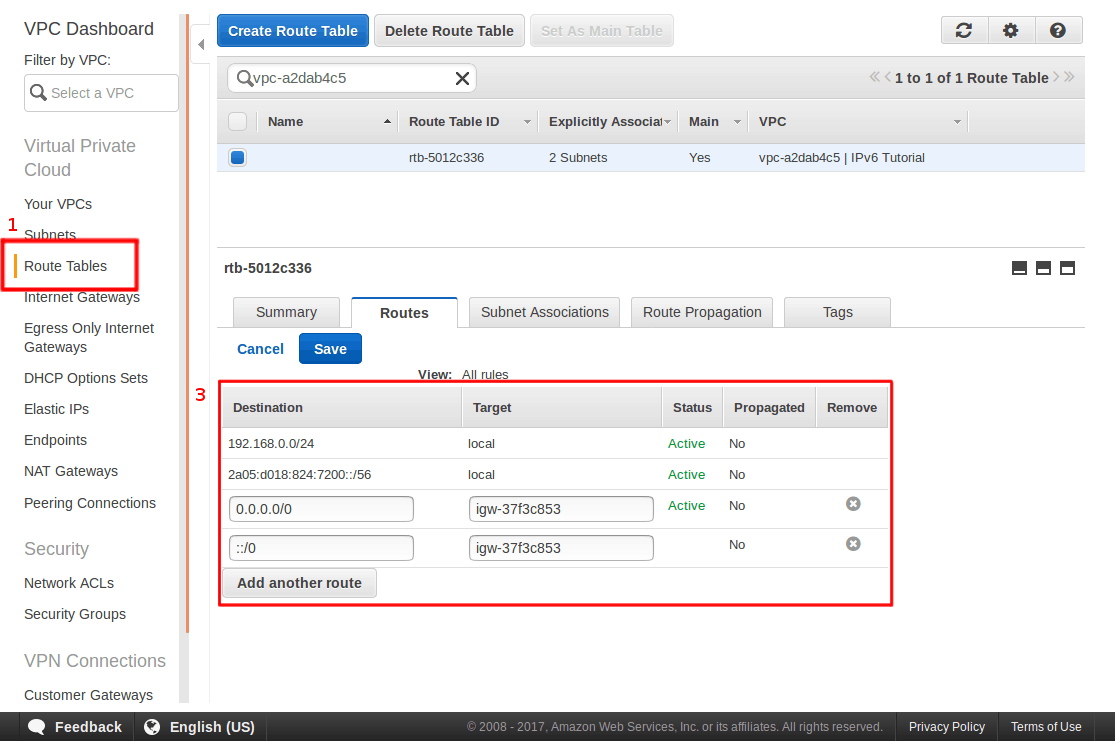
  1. In the navigation bar, select “Route Tables”.
  2. Select the route table attached to your VPC.
  3. Click on the “Routes” tab and then “Edit” the existing table
  4. Add in a rule for Destination “::/0” where the Target is your Internet Gateway.
    1. When you click in the target field it will automatically show you all available Internet Gateways
  5. If you have just created your first Internet Gateway you will also want to route IPv4 traffic out to the internet
  6. “Add another route” with the Destination of 0.0.0.0/0 and a Target of your Internet Gateway.
  7. Click save

::/0 means any IPv6 address, this is why it is at the bottom of your route table because it is catching all un-routed IPv6 traffic and passing it onto your AWS Internet Gateway.

Step 3, Adding new IPv6 routes.

Step 6: Network ACL

There is one final step at the network level, the Network Access Control List (ACL). It is one of many layers of security protecting your servers from attackers. The ACL lists both allowed and denied connections based in IP ranges, so we need to add IPv6. You may find that IPv6 has been configured on your ACL by AWS, in which case you can skip this step.

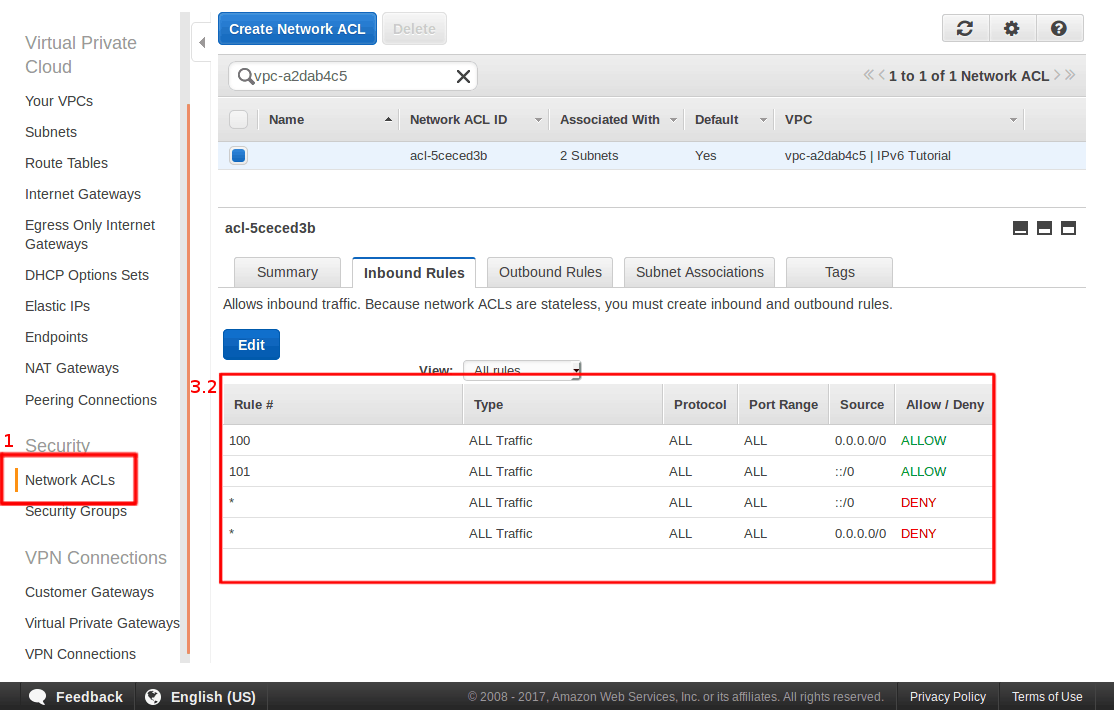
  1. In the navigation bar, select “Network ACLs”, it is under the “Security” subheading.
  2. Select your Network ACL; again you can filter by VPC if needed.
  3. Select the “Inbound Rules” tab and “Edit” the rules
    1. A little known fact about IPv6 is that it is prioritised over IPv4 traffic, if you have IPv6 set up people connecting in will prefer it over IPv4. This means your developers with their static IP addresses need their IPv6 address added as well as their IPv4 address. Just having their IPv4 record whitelisted will still leave them blocked.
    2. With this in mind for each rule in your IPv4 inbound rules there should be one with an IPv6 “Source” field.
      1. As mentioned above ::/0 matches all IPv6 records so you can use it to mirror the 0.0.0.0/0 sources.
      2. Each rule needs a unique name, I iterated up by 1 as I went.A configured Inbound Rule set
  4.  Select the “Outbound Rules” tab and “Edit” the rules
    1. Set up new IPv6 rules mirroring IPv4, just as we did for the Inbound Rules.
  5. You will need to do items 3 and 4 for each Network ACL in your VPC, if you have more than one.

Conclusion

Congratulations you are now IPv6 ready! and I hope you learnt something new about VPC’s, I certainly learnt a lot researching this post. Please leave any questions in the comments or contact us and see how we can help you. 🙂

Now the first part of our IPv6 journey is complete, join us next time where I will show you how to configure the server itself to support this new IPv6 environment.

Feature image background by Eightonesix licensed Freepik.com & IPv6 Icon licensed CC BY 3.0.

AWS services that need to be on your radar

We are avid AWS users and the AWS Summit this year really added to our excitement. AWS have grown quicker and larger than any other server host in the past few years and with it there has been a flood of new AWS technologies and services. Below are our favourite solutions, it is time to put them on your radar.

What is AWS?

AWS (Amazon Web Services) are the biggest cloud server provider, their countless services and solutions can help any company adopt the cloud. Unlike some of their competitors AWS allow you to provision server resources nearly instantly, within minutes you can have a server ready and running. This instant provisioning makes AWS a must for anyone looking into scalable infrastructure.

1) Elastic File System (EFS)

EFS has been on our radar since it was first announced, EFS is Amazons solution to NFS (Network File System) as a service. It is the perfect addition to any scalable infrastructure, enabling you to share content instantly between all of your servers and all availability zones. If you wanted your own highly available NFS infrastructure it would take at least five servers and hundreds of pounds to recreate their scale. It has been a long time coming and EFS has finally been released from beta, rolling out into other regions including the EU, huzzah!

2) Codestar

Codestar is Amazon’s new project management glue, it pulls together a number of Amazon services making application development and deployment a seamless process. Within minutes you can turn your code repository into a highly available infrastructure. Codestar automatically integrates with:

  • CodeCommit – A git compatible repository hosting system which scales to your needs.
  • CodeBuild – Compile, test and create applications that are ready to deploy.
  • CodeDeploy – Automatic rolling out updates to your infrastructure, CodeDeploy handles the infrastructure helping you avoid downtime.
  • CodePipeline -The process getting your code from CodeCommit, into testing, into CodeDeploy.
  • Atlassian JIRA – CodeStar can also tie into JIRA, a popular Issue tracking and project management tool.

I have just started using CodeStar for my personal website and I love it, it makes continuous deployment a pleasure. All of those little tweaks are just one git push away from being live and if anything goes wrong CodeDeploy can quickly roll back to previous versions.

3) Athena

In a couple of clicks Athena makes your S3 data into a SQL query-able database. It natively supports: CSV, TSV, JSON, Parquet, ORC and my favourite Apache web logs. Once the data has loaded you can get started writing SQL queries.

Earlier this week there was an attack on one of our servers, in minutes I had the web logs into Athena and was manipulating the data into reports.

4) Elastic Container Service (ECS)

ECS takes all of the hassle out of your container environment letting you focus on developing your application. ECS has been designed with the cloud ethos from the ground up, designed for scaling and isolating tasks. It ties straight into AWS CloudFormation allowing you to start a cluster of EC2 instances all ready for you to push your Docker images and get your code running.

In Summary

One common theme you might have picked up on is that Amazon is ready for when you want to move fast. Streamlined processes are at the heart of their new offerings, ready for horizontal scaling and ready for continuous integration.

Are you making the most of AWS?

Is the cloud is right for you?

Drop us a line and we will help you find your perfect solution.

Feature image by Robbie Sproule licensed CC BY 2.0.

See you at AWS Summit London 2015

We can’t wait to attend the AWS Summit in London next week on the 15th April 2015.

We will be there all day so shout if you want to meet up.


Buzzword Bingo

As happens when you are a company registered on social media sites we occasionally get sent invites to advertise on their networks. We’ve always been proud to receive most of our business via referrals and word of mouth but when LinkedIn offers you $100 of free advertising it seems silly to say no. The results turned out to be an interesting window into the words and phrases that are popular at the moment.

When creating adverts online it’s always a good idea to run more than one advert at once, you can then run them for a bit and keep modifying the one that’s doing the worse. After a while you end up with some adverts that are pretty well tuned for the people you want to attract. We didn’t bother modifying any ads this time as it was a short ad run but we did create a number of different ads with slightly different wording.

(Quick side note: When running ads it’s always a good idea to link them to your websites analytics. Not just to separate out the traffic to your site but to link that traffic to actual contacts/sales etc. Surely it’s better to get 100 clicks to your site where 10 become customers than get 10000 clicks and 1 customer. Especially when you are paying by the click!)

To keep things easy we set a maximum spend of $10 per day and ran all of the ads below for 10 days…

Advert Clicks Impressions CTR
Cloud ComputingLet us show you how to get the most from powerful Amazon AWS services. 51 162168 0.031%
Electronics & AutomationIntegrate your website with the real world. The ideas are endless. 1 10451 0.010%
VMwareWe can help you adopt a Virtualisation solution that is right for you. 1 10552 0.009%
Amazon AWSLet us show you how to get the most from powerful Cloud Computing services. 3 40700 0.007%
SysAdminLet us worry about the system administration of your server. 0 12724 0.000%
VirtualisationWe can help you adopt a VMware solution that is right for you. 0 10403 0.000%

As you can see, the Cloud Computing and Amazon AWS ads are identical with the words swapped. The same is true for the VMware and Virtualisation adverts.

What does all this mean?

The Impression Count is the number of times that LinkedIn users have been show each advert. LinkedIn decide when to show your advert and while you can pay more money to “bid” to a higher position it is linked to the text in the page that LinkedIn is showing to the user. It is therefore safe to say that LinkedIn treat the title of your ad as more important that the text (Ads with the same overall text had very different impression counts).

CTR stands for Click Through Rate, how many and what percentage of the people that saw the ad actually clicked on it. As you can see the numbers are low but at $2 per click the money goes down fast.

Results

Based on all the above we can make the following statements about the popularity of certain buzzwords:

  • A lot more people are talking about Cloud Computing than Virtualisation. This was quite surprising to us. While Cloud Computing is the buzzword du jour Virtualisation is the pin that runs it and for the swing to be so unbalanced is slightly unnerving.
  • “Cloud Computing” is bigger than “Amazon AWS”. this makes sense, it’s a subset. AWS is just one vendor of cloud computing services.
  • “VMware” is more popular than “Virtualisation”. no, wait, what!? A very interesting find. I don’t think anyone would argue that VMware is one of the biggest players in the Virtualisation market but for it to be bigger is interesting.
  • Advertising on LinkedIn is expensive! $100 for 56 clicks to our website. Lets just say we are glad it was a free trial and we don’t need to heavily advertise 🙂

I realise the sample numbers on this were low. We would love to hear if you have any other statistics to back this up or blow us out the water. Feel free to comment below.